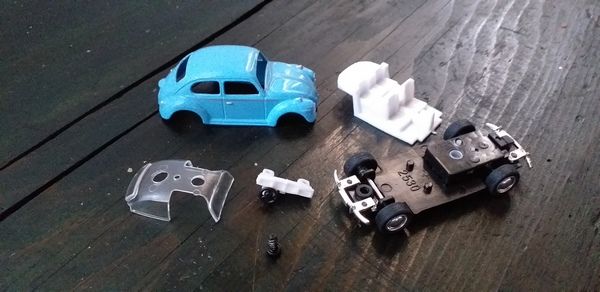
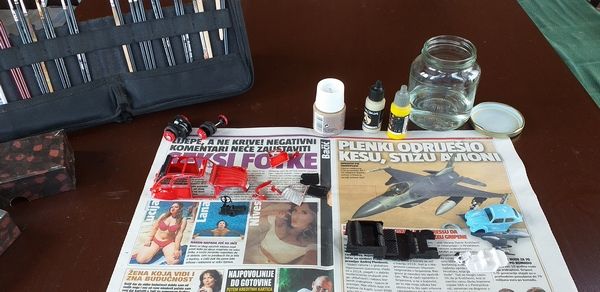
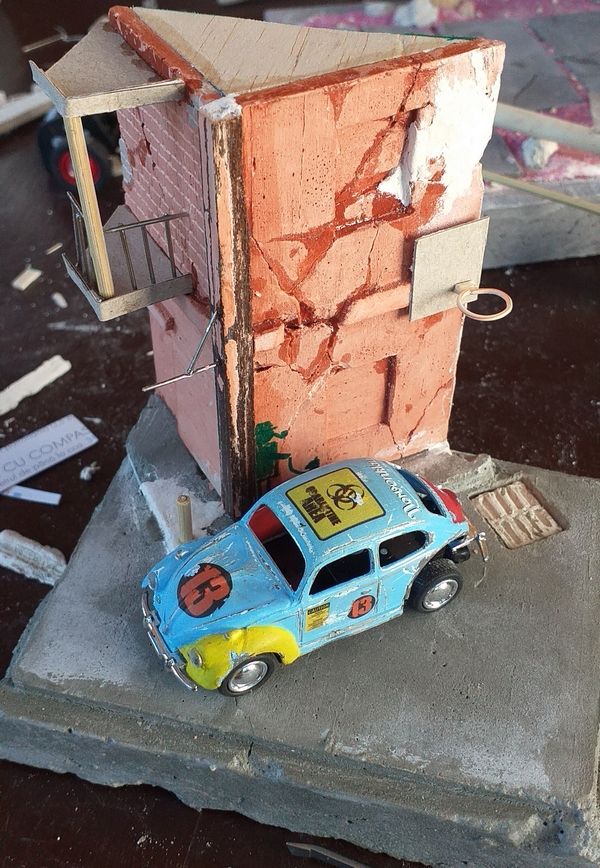
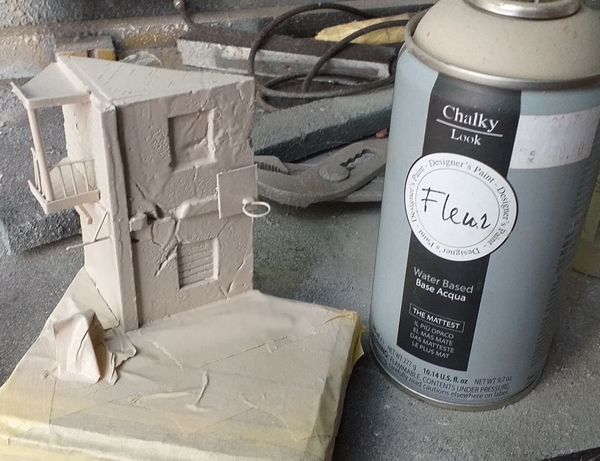
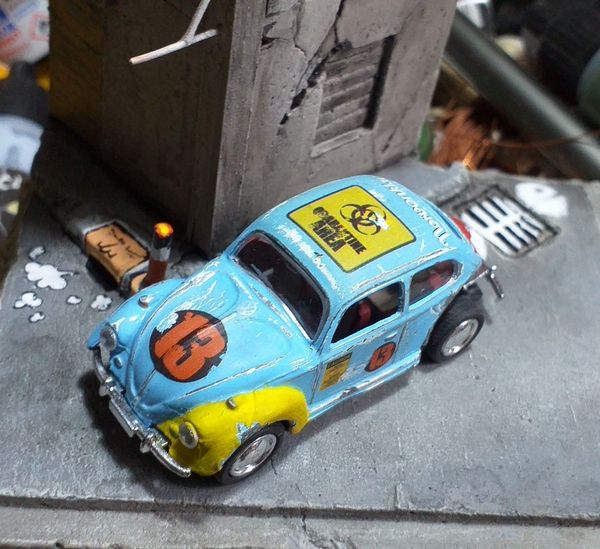
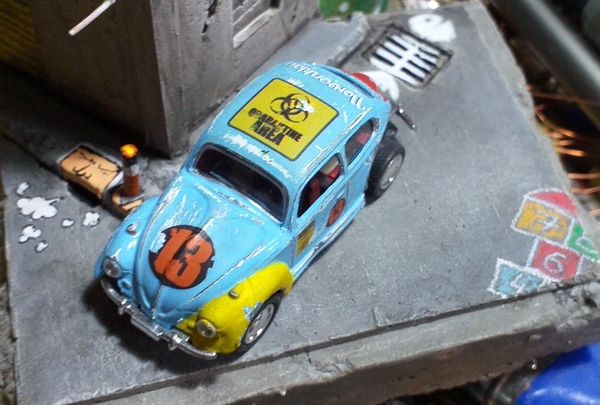
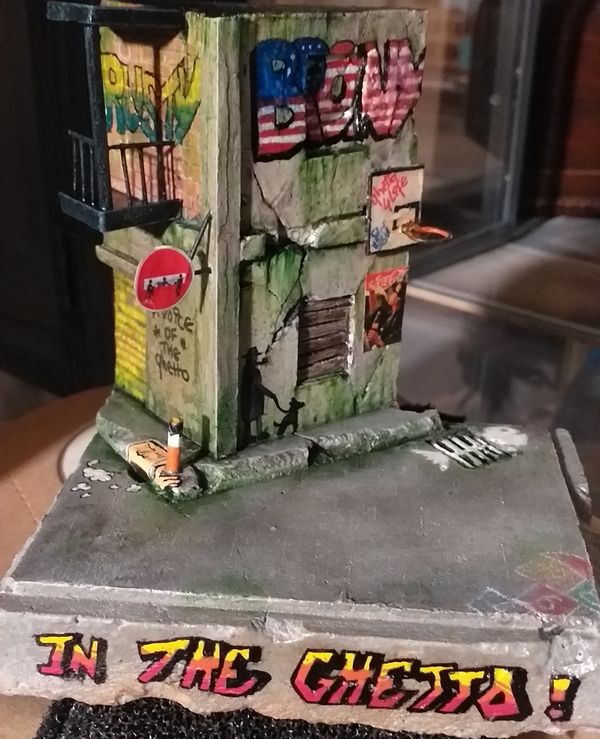
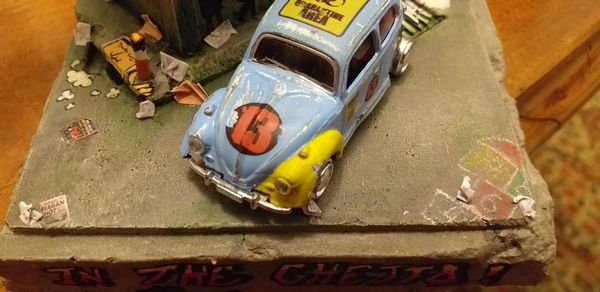
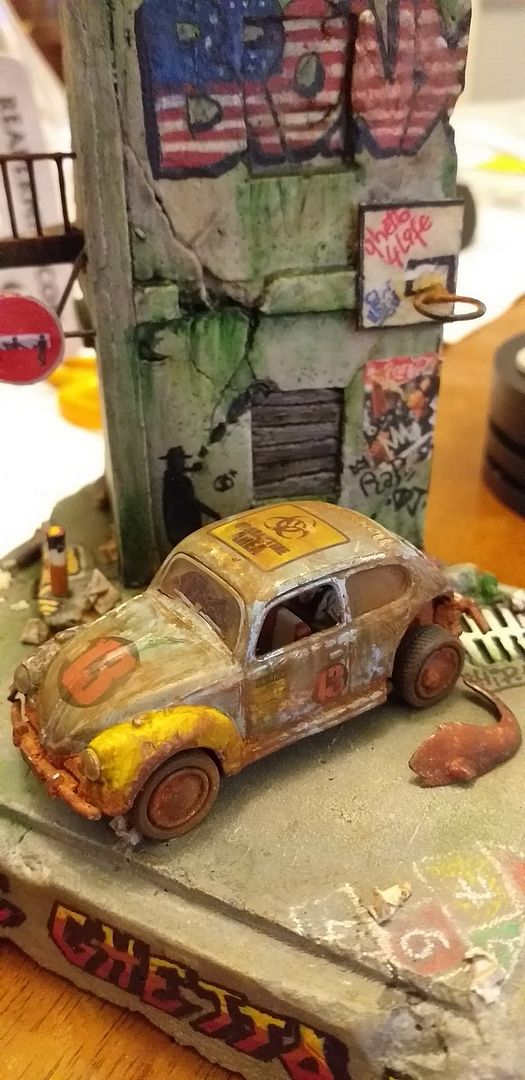
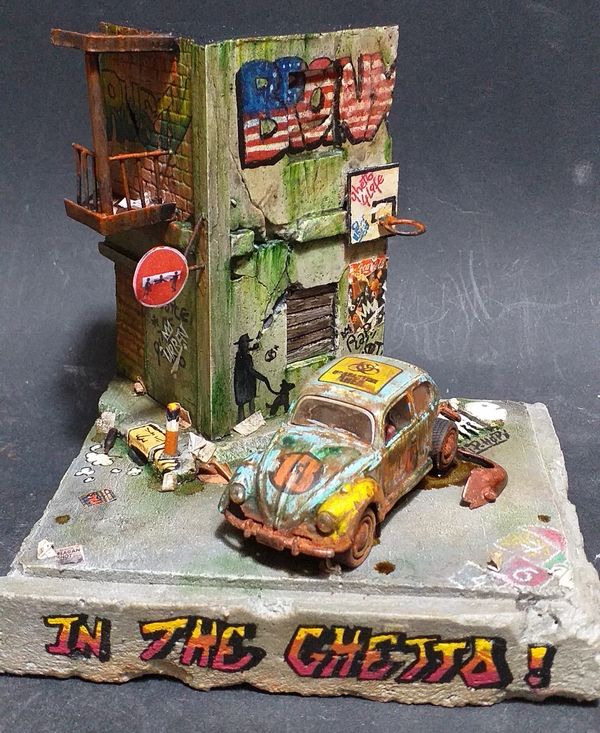
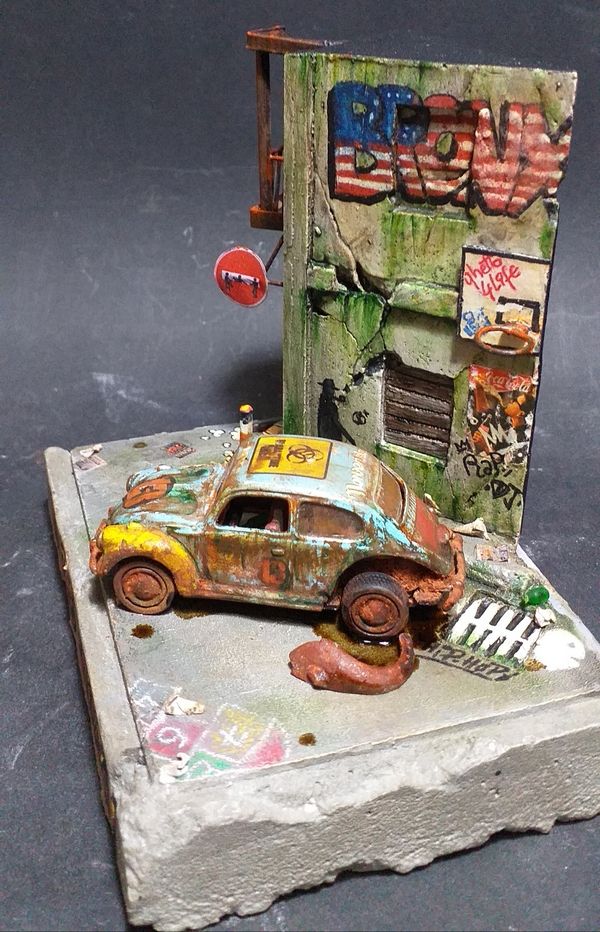
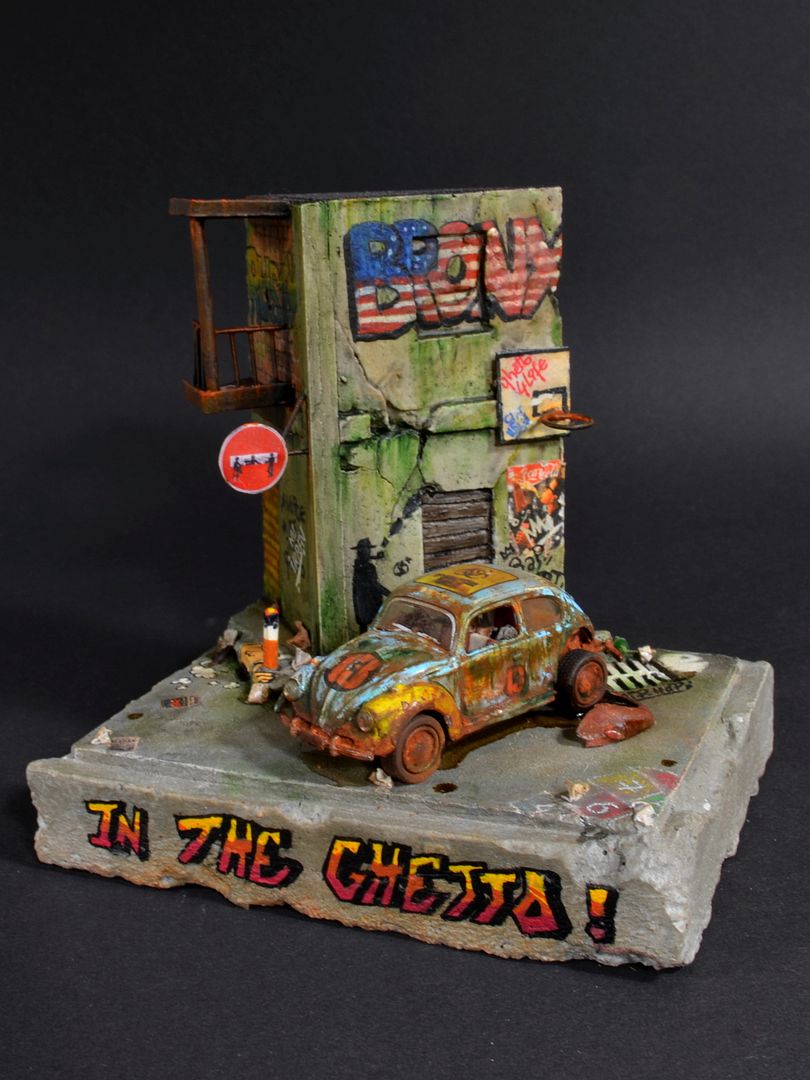
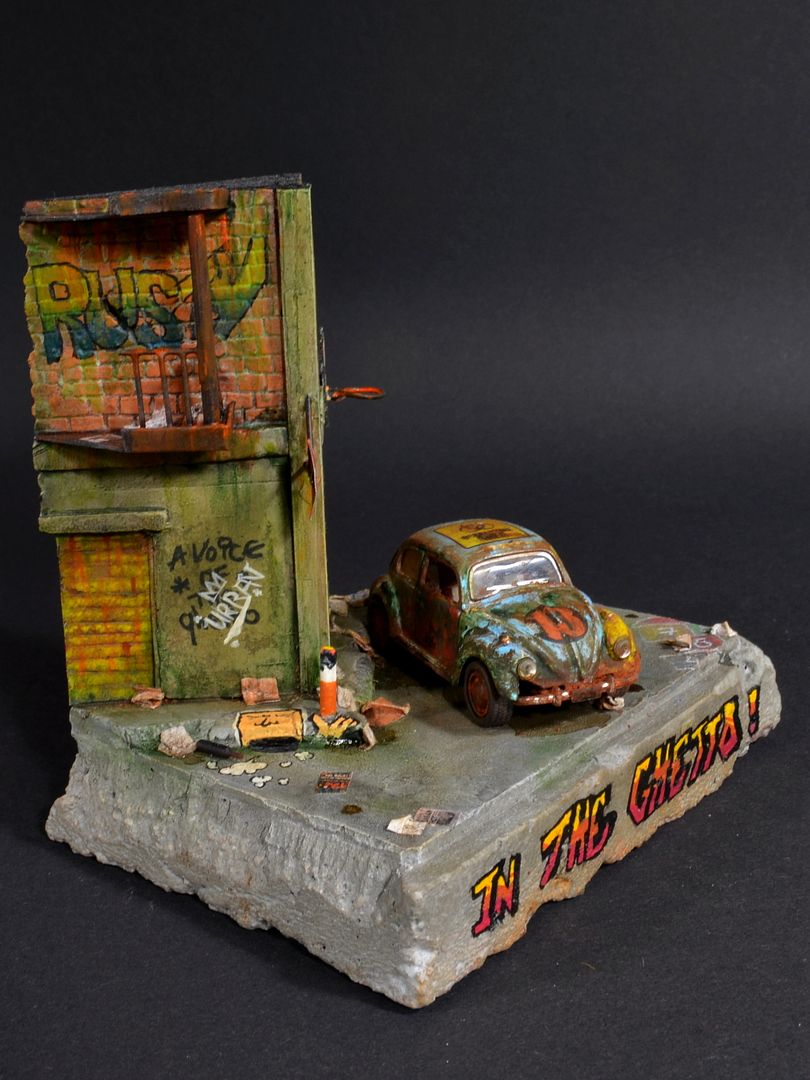
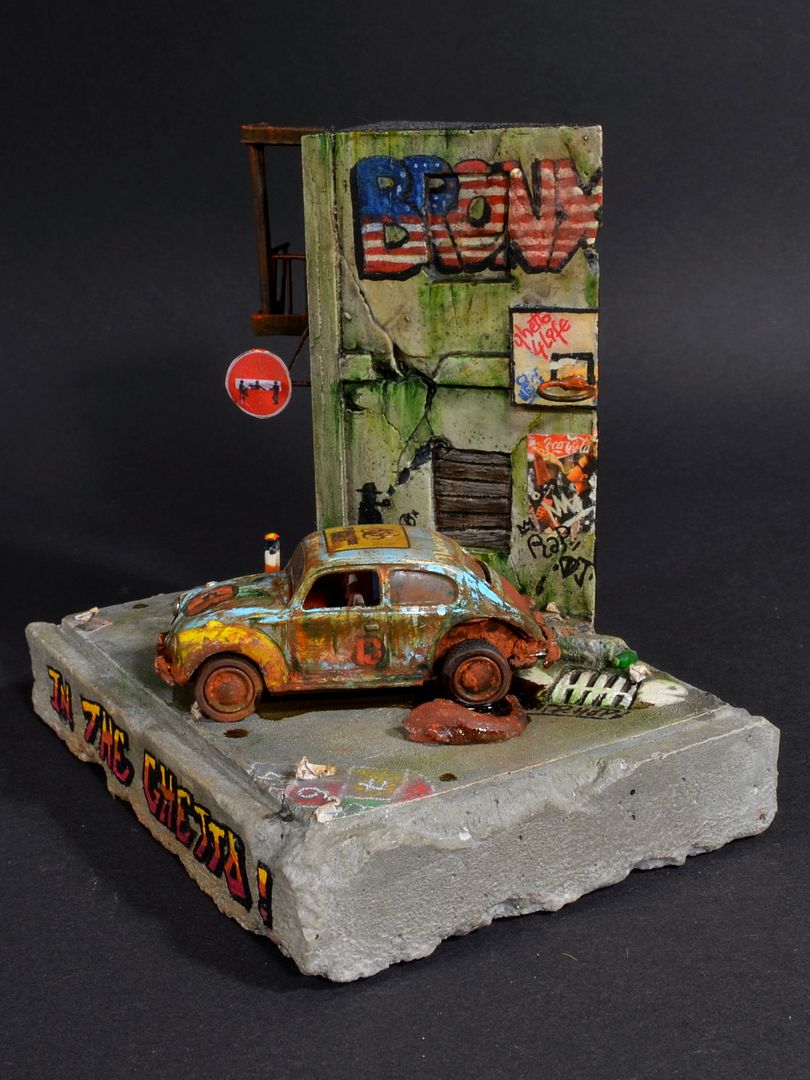
Foto album izrade diorame In the Ghetto
Tijekom ovog razdoblja socijalnog distanciranja uzrokovanog virusom COVID-19, nastojat ćemo objaviti što više tutoriala (korak-po-korak) i hobby članaka koje su izradili naši članovi ili članovi FB grupe Miniature Painters Croatia.
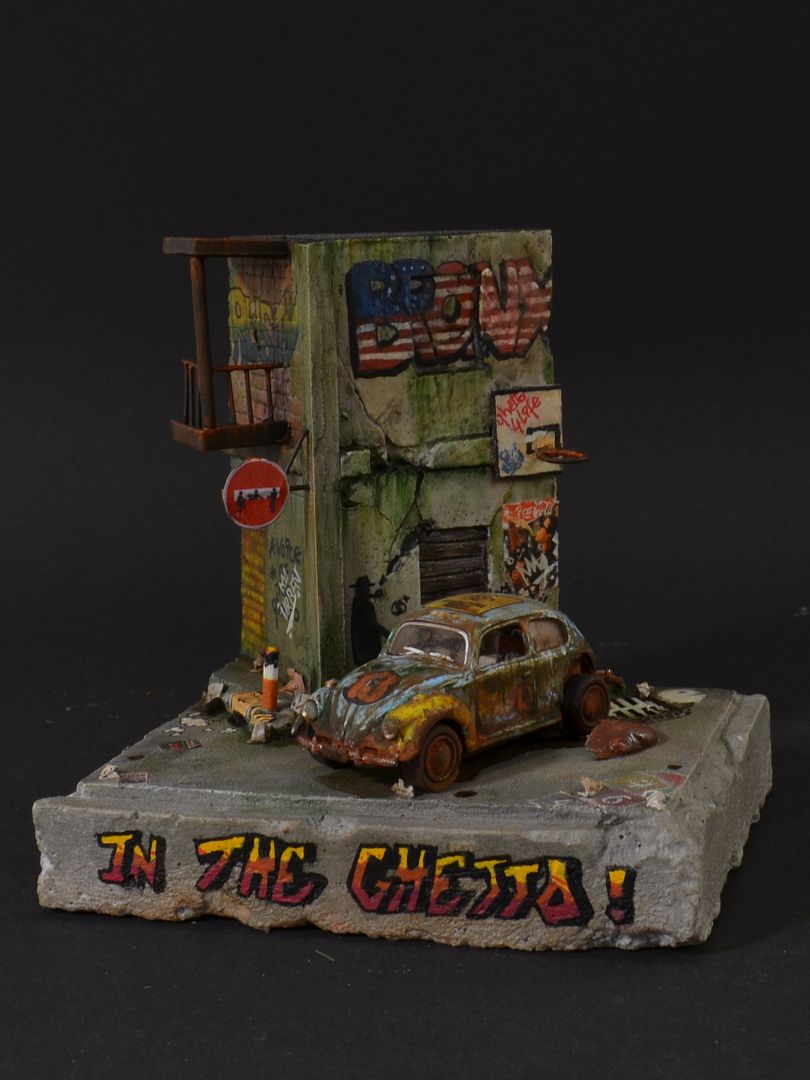
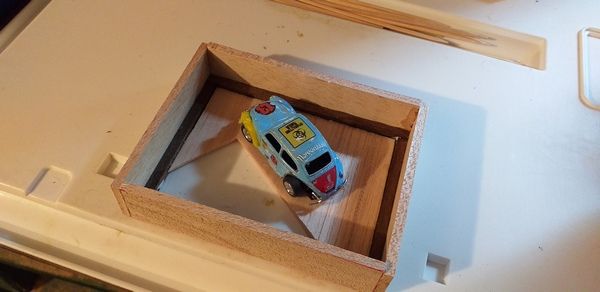
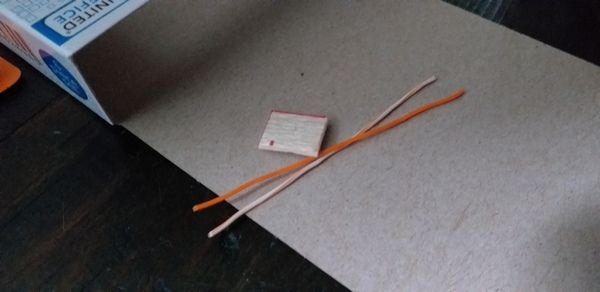
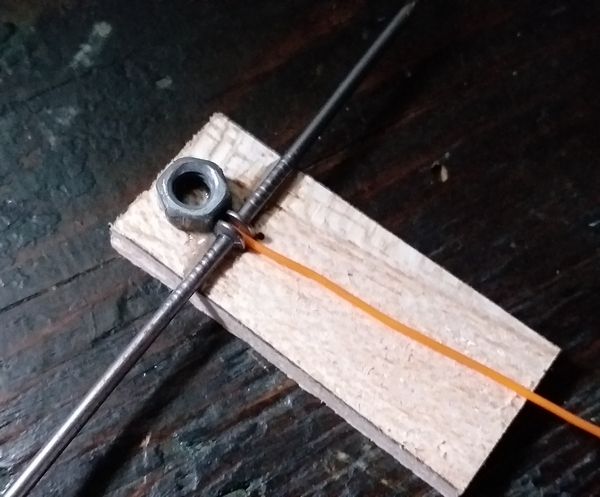
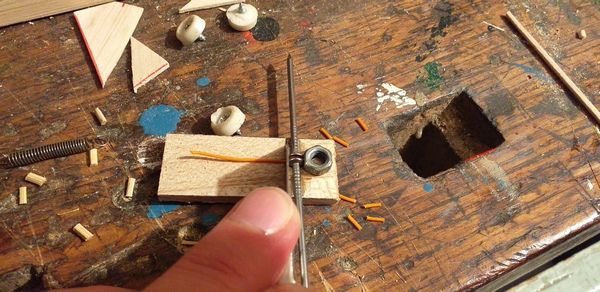
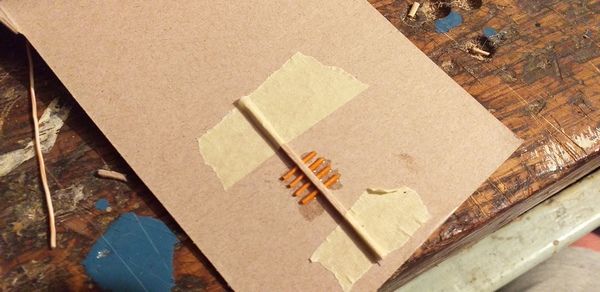
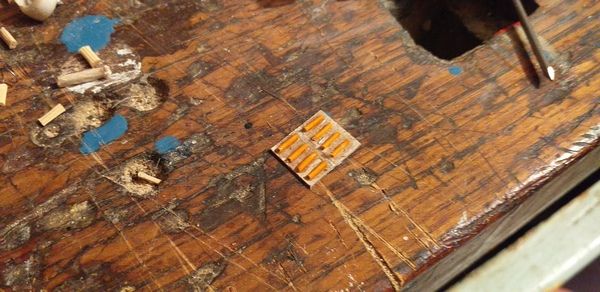
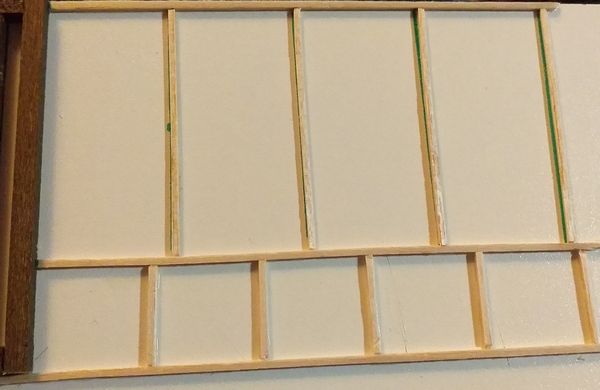
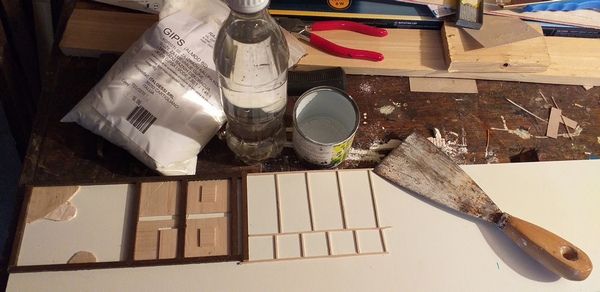
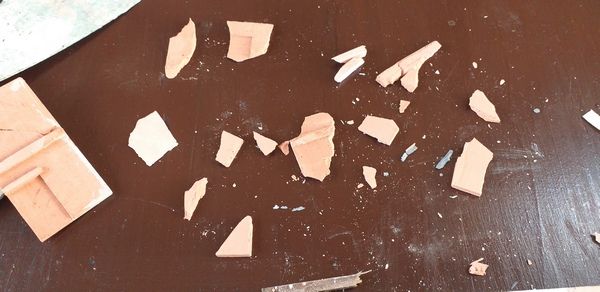
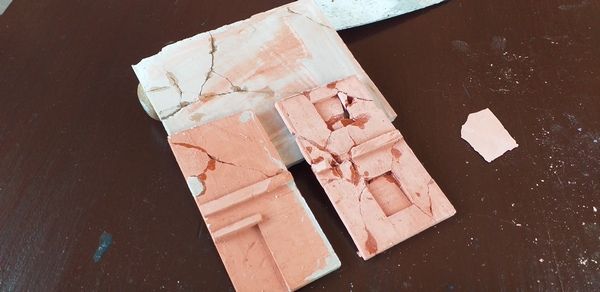
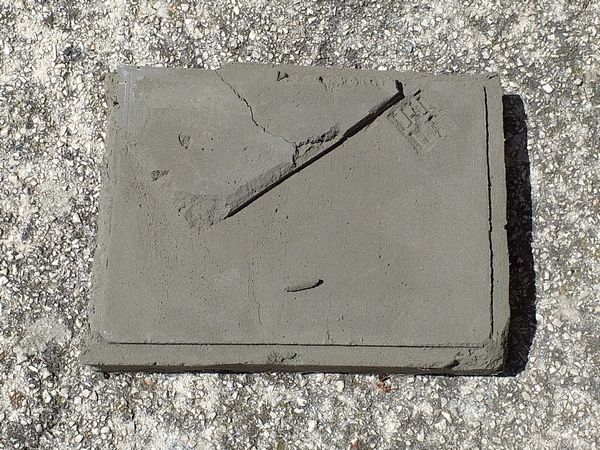
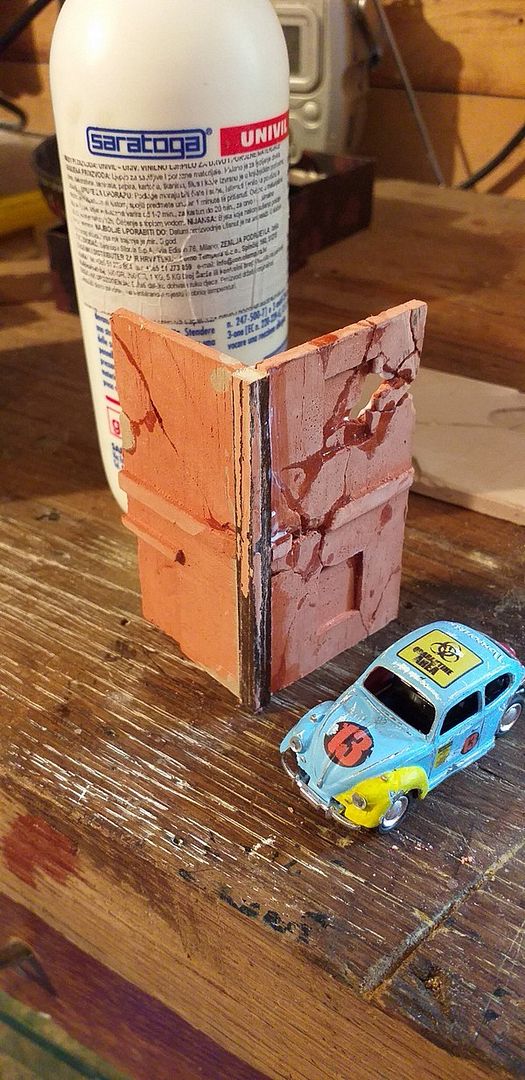
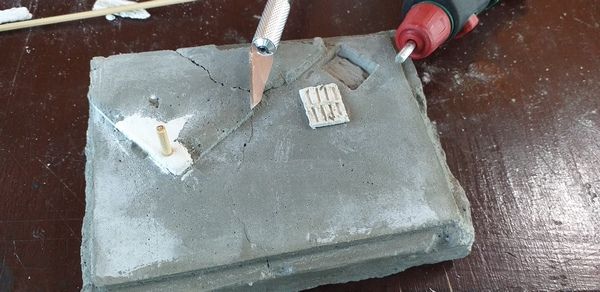
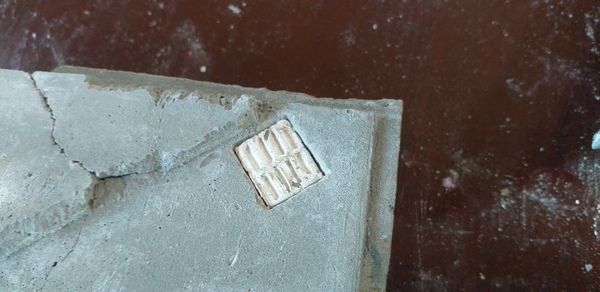
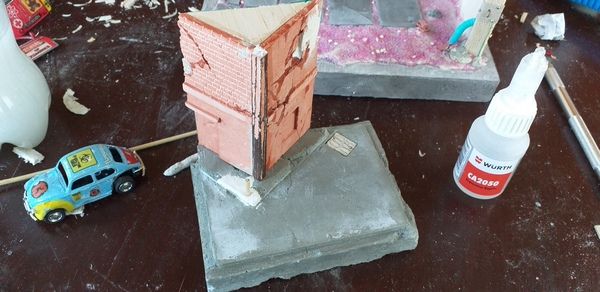
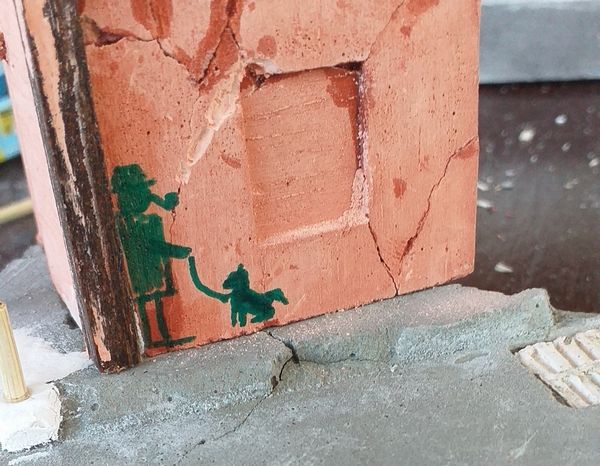
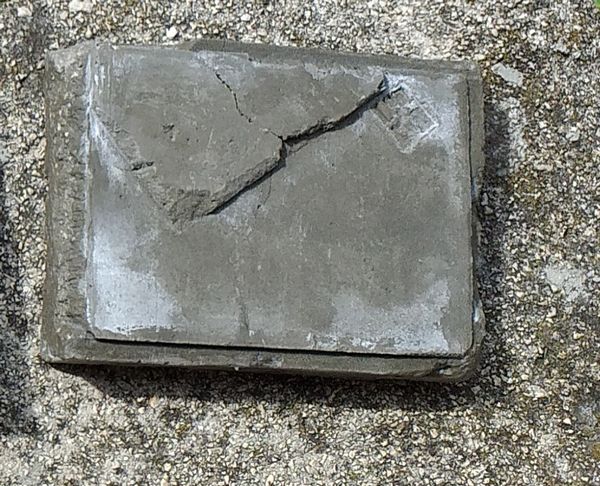
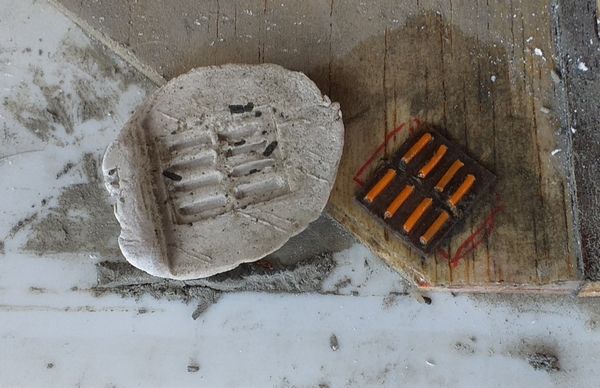
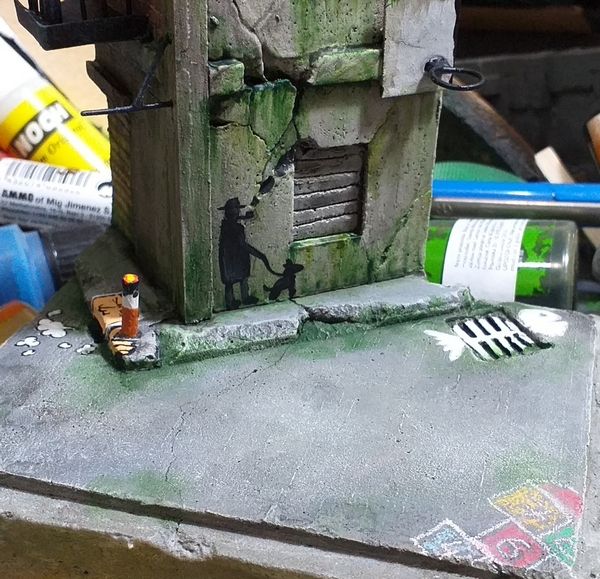
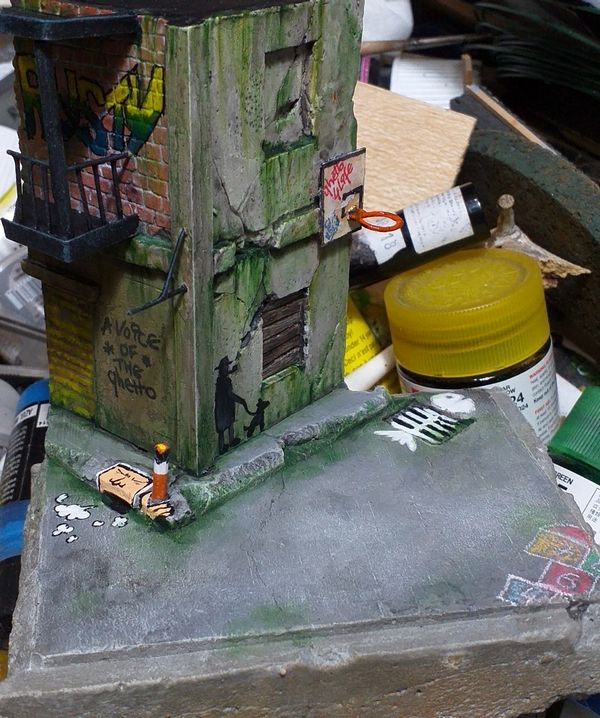
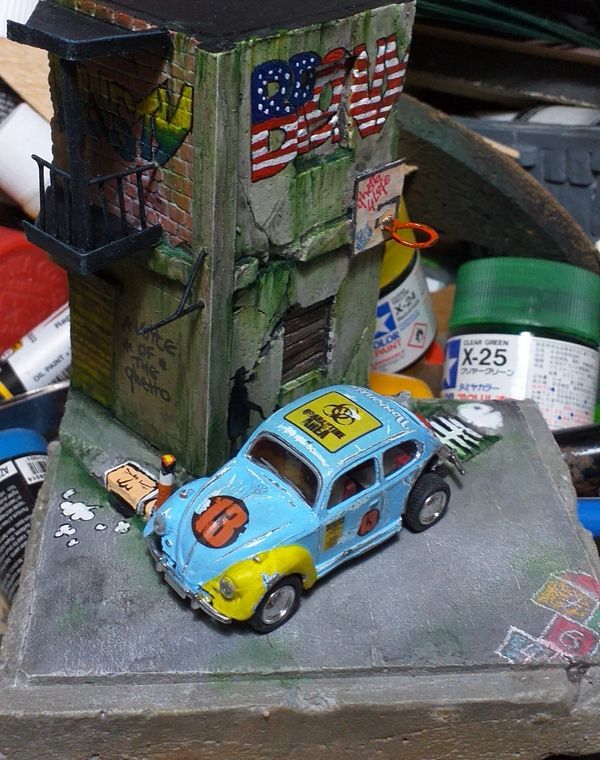
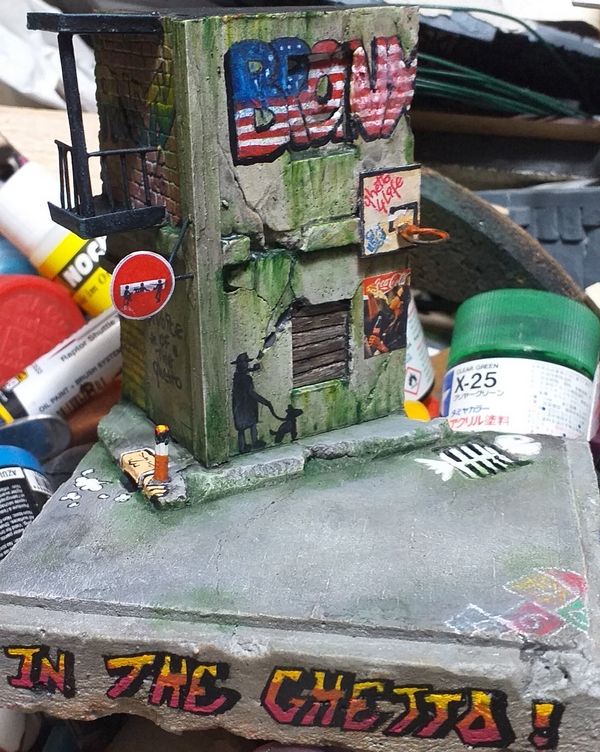
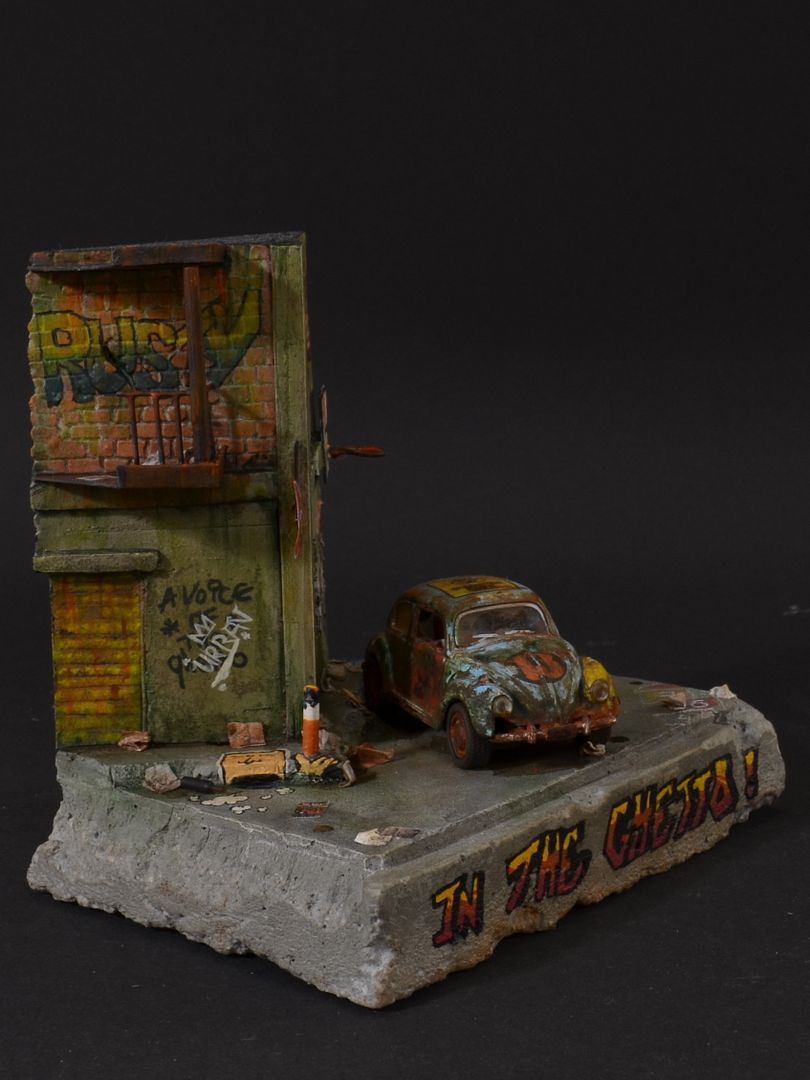
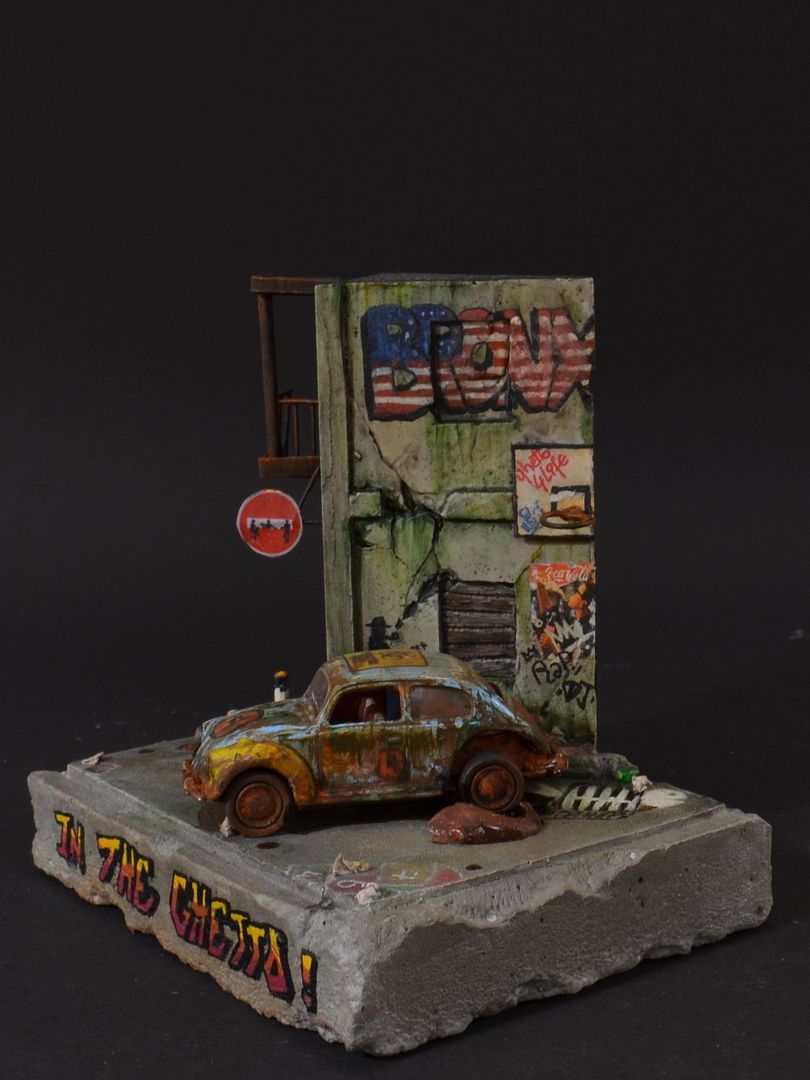
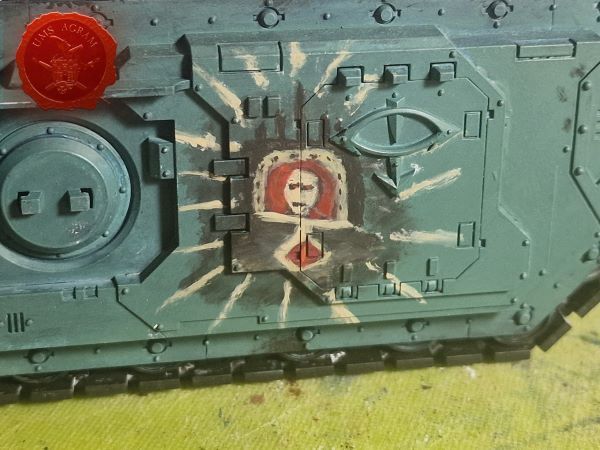
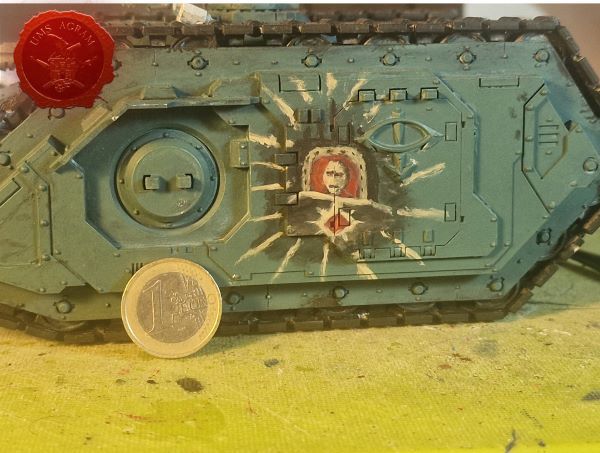
Ovo je foto album koji prati izradu diorame pod nazivom In the Ghetto. Dioramu je izradio Marko Paunović i ona je osvojila prvo mjesto u kategoriji Duel/Diorama na ovogodišnjem natjecanju Black Queen Hobby and Miniature Painting Competition.
Zgrada i baza su izrađeni iz betona i gipsa. Svi detalji, poput ograde, šahta su nastali u samoizradnji bilo lijevanjem, skulpturiranjem ili nekim drugim oblikom samoizrade iz žice. Neki detalji su dijelovi iz Mini Art Models setova (boce), naljepnice su većinom od tvrtke Fallout Hobbies. Većina "weathering" efekata su napravljena pomoću ulja, oilbrusher-a, wash-eva i pigmenata firme Ammo by Mig Jimenez. Ostali pigmenti su od Model Display Products.


Najnoviji članci
-
Posjetili smo: Warhammer World – dio 1
array(2) { ["Article"]=> array(10) { ["id"]=> string(3) "503" ["member_id"]=> string(2) "35" ["title_eng"]=> string(34) "We visited: Warhammer World - pt.1" ["title_hrv"]=> string(40) "Posjetili smo: Warhammer World – dio 1" ["mask_eng"]=> string(32) "we_visited_warhammer_world_-_pt1" ["mask_hrv"]=> string(35) "posjetili_smo_warhammer_world_dio_1" ["content_eng"]=> string(7283) "Marko Paunović, 27.04.2026.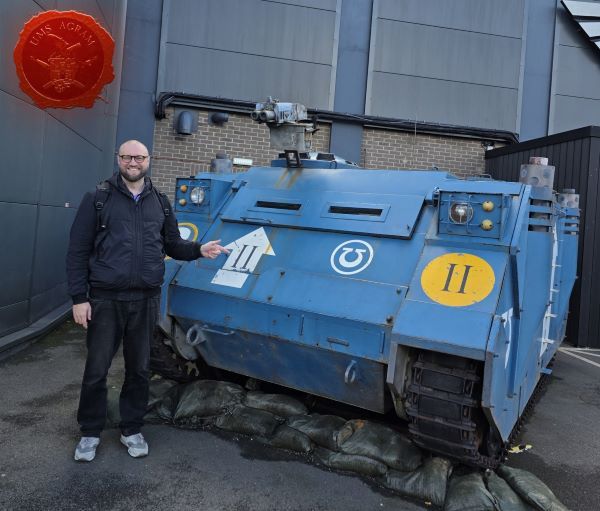
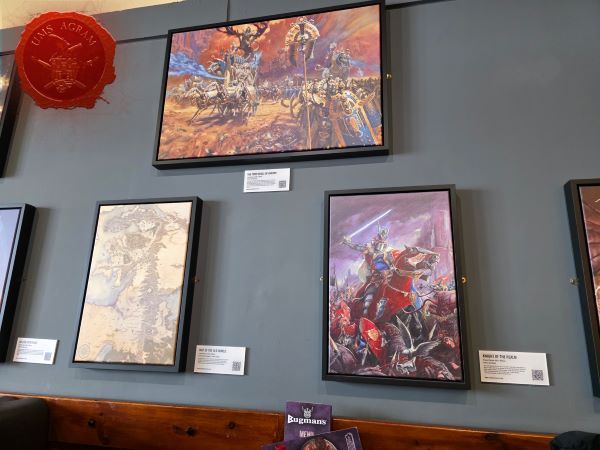
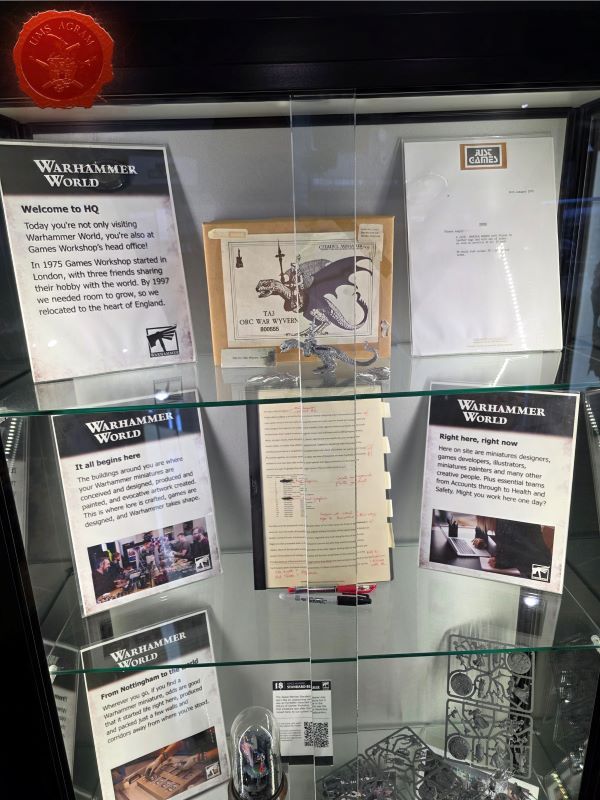
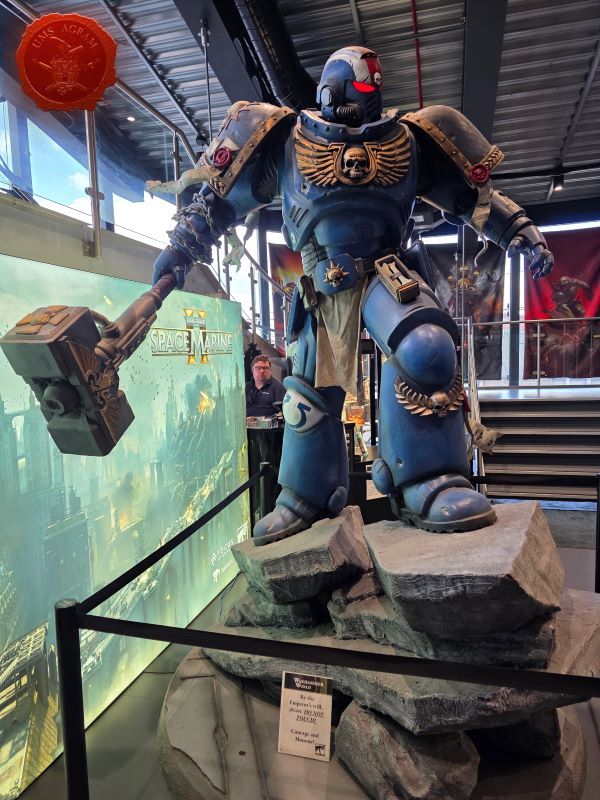
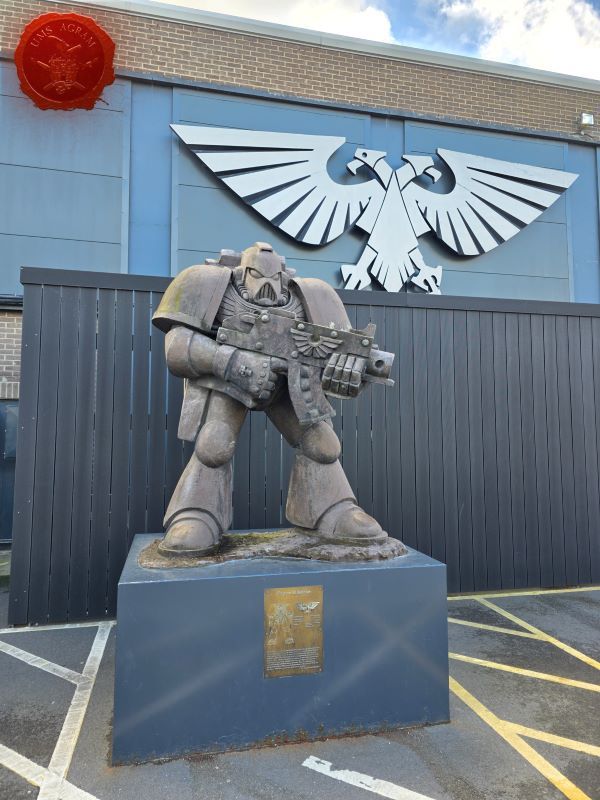
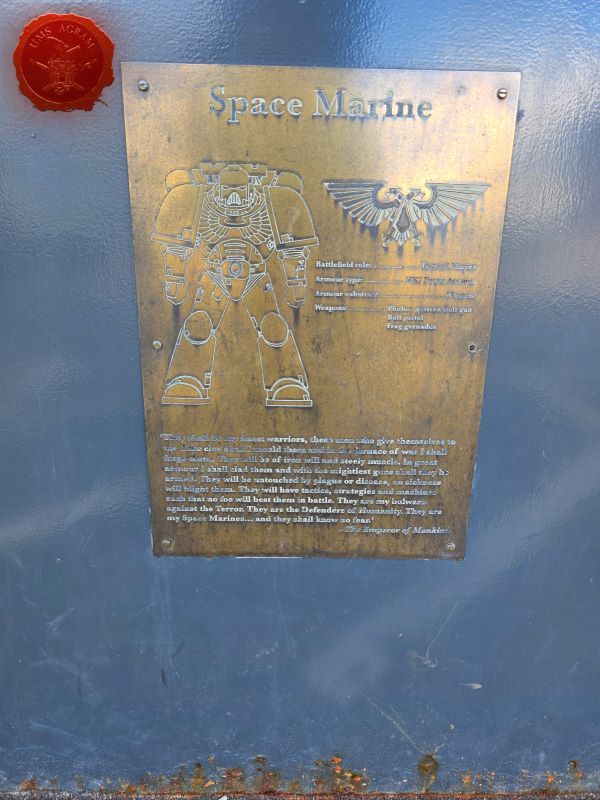
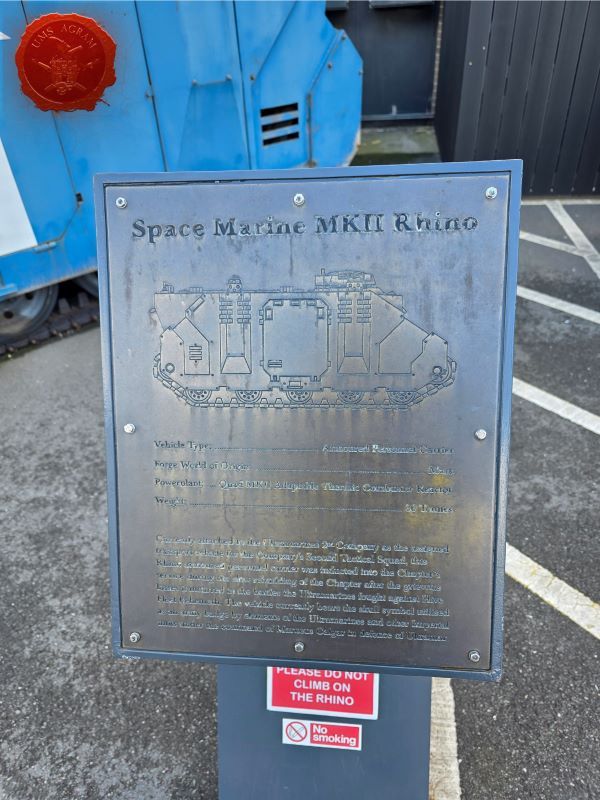
For any Warhammer hobbyist, a visit to Warhammer World in Nottingham is a pilgrimage of sorts. It is the epicenter of the entire Games Workshop culture - a combination of global corporate headquarters, visitor center, exhibition space, gaming hall, specialty store and themed bar, all gathered in one location. It should also be taken into account that the large gaming hall hosts Grand Tournaments for all games published by Games Workshop, and since our Ivan found himself in WHW on 18.4.2026. there was a WH40k tournament on the schedule, so the experience of the exhibition, Bugman Bar, WHW store, workshops, and gaming hall was also enhanced by the grand tournament that took place that day. This series follows his adventures…

1. Historical Context
1.1. The Founding of Games Workshop
Games Workshop was founded in 1975 in London, at 15 Bolingbroke Road. The founders were John Peake, Ian Livingstone and Steve Jackson (not to be confused with the American game designer of the same name). Initially, the company was not at all related to miniatures - they produced wooden boards for traditional games such as backgammon, manchala, mill and go. The same year, the Owl and Weasel newsletter was launched, which would later, in June 1977, evolve into the now legendary White Dwarf magazine. During the second half of the 1970s, Games Workshop became the main European distributor of the American role-playing game Dungeons & Dragons, and by the end of the decade it had also started publishing its own titles. A key turning point came in 1978/1979, when Games Workshop financed the establishment of Citadel Miniatures in Newark-on-Trent (Nottinghamshire). Citadel produced metal figurines used in GW's games, and the "Citadel" brand remains synonymous with Games Workshop miniatures to this day.
1.2. The Move to Nottingham and "Lead Belt"
The move of Games Workshop from London to Nottingham was not a one-off, but a gradual process linked to the person of Bryan Ansell. Ansell became director of Games Workshop in 1985, bought the company from Jackson and Livingstone in the late 1980s, and refocused it from role-playing games to tabletop strategy products. It was he who physically moved the company from London to Nottinghamshire to bring it closer to Citadel Miniatures. The final consolidation took place in October 1997, when all of Games Workshop's UK operations were moved to their current headquarters in Lenton, a suburb of Nottingham. This location still houses the corporate headquarters, design studio, White Dwarf magazine editorial office, European distribution centre and online sales centre. The concentration of miniatures manufacturers in the wider Nottinghamshire area has led to the area now being referred to in hobby circles as the "Lead Belt". Most of the companies that make up that belt today - Warlord Games, Mantic Games, Perry Miniatures, Wargames Foundry and others - were founded by former Games Workshop employees, which speaks of an ecosystem that has developed around one company for decades.
1.3. Warhammer as a product
Warhammer Fantasy Battle was first published in 1983 by Bryan Ansell, Rick Priestley and Richard Halliwell. The game literally saved Citadel from stagnation and launched the expansion of ranges of fantasy miniatures.
Warhammer 40,000 (40k) was launched in 1987 under the original title Rogue Trader, with Rick Priestley as the main author. Over six generations of rules, the game has become the leading sci-fi wargaming franchise in the world and is now the core product of Games Workshop. The 10th edition of the rules is currently in circulation.

You can find more photos on our social networks.
" ["content_hrv"]=> string(7416) "
Za svakog hobista koji se bavi Warhammerom, posjet Warhammer Worldu u Nottinghamu predstavlja svojevrsno hodočašće. Riječ je o središnjem mjestu cjelokupne Games Workshop kulture - kombinaciji globalnog korporativnog sjedišta, posjetiteljskog centra, izložbenog prostora, igračke dvorane, specijalizirane trgovine i tematskog bara, sve okupljeno na jednoj lokaciji. Također treba uzeti u obzir da se u velikoj igraćoj dvorani održavaju Grand Turniri za sve igre koje izdaje Games Workshop, a budući da se naš Ivan našao u WHW 18.4.2026. na rasporedu je bio WH40k turnir, pa je samom doživljaju izložbe, Bugman Bara, WHW dućana, radionica, i igraće hale doprinio i veliki turnir koji se odvijao taj dan. Ovaj serijal prati njegove dogodovštine…
1. Povijesni kontekst
1.1. Osnutak Games Workshopa
Games Workshop osnovan je 1975. godine u Londonu, na adresi 15 Bolingbroke Road. Osnivači su bili John Peake, Ian Livingstone i Steve Jackson (ne treba ga miješati s istoimenim američkim game dizajnerom). U početku tvrtka uopće nije bila vezana uz minijature - proizvodili su drvene ploče za tradicionalne igre poput backgammona, manchale, mlina i goa. Iste godine pokrenut je i newsletter Owl and Weasel, koji će kasnije, u lipnju 1977., evoluirati u danas legendarni časopis White Dwarf. Tijekom druge polovice 1970-ih Games Workshop postaje glavni europski distributer američke role-playing igre Dungeons & Dragons, da bi krajem desetljeća počeo izdavati i vlastite naslove. Ključna prekretnica dogodila se 1978./1979. godine, kada Games Workshop financira osnivanje Citadel Miniatures u mjestu Newark-on-Trent (Nottinghamshire). Citadel je proizvodio metalne figurice koje su se koristile u GW-ovim igrama, a brand "Citadel" do danas je ostao sinonim za Games Workshop minijature.
1.2. Preseljenje u Nottingham i "Lead Belt"
Preseljenje Games Workshopa iz Londona u Nottingham nije bilo jednokratno, već postupan proces vezan uz osobu Bryana Ansella. Ansell je 1985. godine postao direktor Games Workshopa, otkupio je tvrtku od Jacksona i Livingstonea krajem 1980-ih, te je preusmjerio s role-playing igara prema proizvodima za stolne strateške igre. Upravo on je tvrtku fizički preselio iz Londona u Nottinghamshire kako bi je približio Citadel Miniatures. Konačna konsolidacija dogodila se u listopadu 1997. godine, kada su sve britanske operacije Games Workshopa premještene u današnje sjedište u Lentonu, predgrađu Nottinghama. Na toj se lokaciji i danas nalaze korporativno sjedište, dizajn studio, redakcija časopisa White Dwarf, distribucijski centar za Europu te online prodajni centar. Koncentracija proizvođača minijatura u širem području Nottinghamshirea dovela je do toga da se čitav kraj danas u hobi krugovima naziva "Lead Belt" (Olovni pojas). Većina tvrtki koje danas čine taj pojas - Warlord Games, Mantic Games, Perry Miniatures, Wargames Foundry i druge - osnovana je od strane bivših zaposlenika Games Workshopa, što govori o ekosustavu koji se desetljećima razvijao oko jedne tvrtke.
1.3. Warhammer kao proizvod
Warhammer Fantasy Battle prvi je put objavljen 1983. godine, a autori su Bryan Ansell, Rick Priestley i Richard Halliwell. Igra je doslovno spasila Citadel od stagnacije i pokrenula širenje fantasy linija figurica.
Warhammer 40,000 (40k) lansiran je 1987. godine pod izvornim nazivom Rogue Trader, a glavni autor bio je Rick Priestley. Tijekom šest generacija pravila, igra je postala vodeća sci-fi wargaming franchise na svijetu i danas predstavlja središnji proizvod Games Workshopa. Trenutno je u opticaju 10. izdanje pravila.
Više fotografija možete naći na našim socijalnim mrežama.
" ["created"]=> string(19) "2026-04-27 11:05:27" ["modified"]=> string(19) "2026-04-27 11:05:27" } ["Member"]=> array(10) { ["id"]=> string(2) "35" ["group_id"]=> string(1) "1" ["first_name"]=> string(5) "Marko" ["last_name"]=> string(9) "Paunović" ["first_name_mask"]=> string(5) "marko" ["last_name_mask"]=> string(8) "paunovic" ["username"]=> string(5) "marko" ["password"]=> string(40) "3bd37b326d19d1880d3b93a4b32e8fb3a90fa122" ["born"]=> string(19) "2033-03-07 20:35:00" ["created"]=> string(19) "2009-06-02 20:37:03" } } -
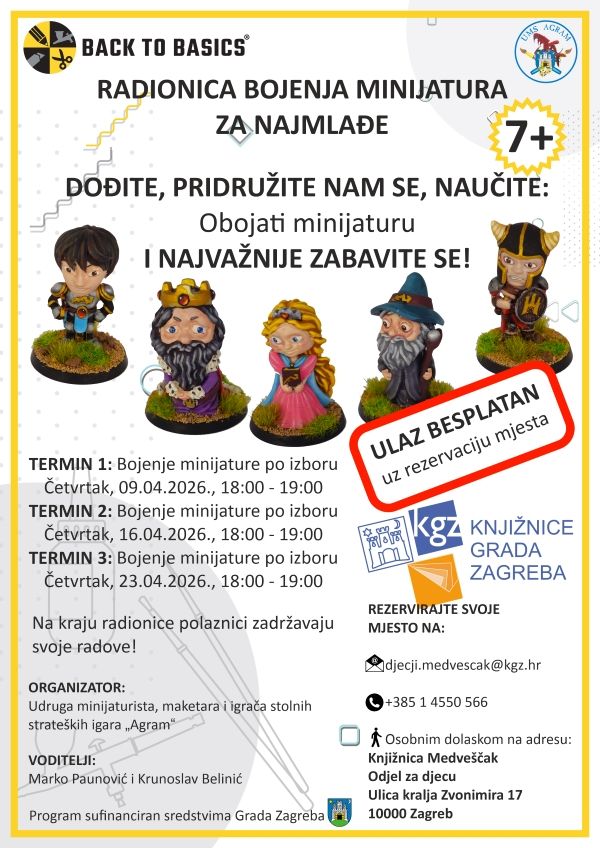
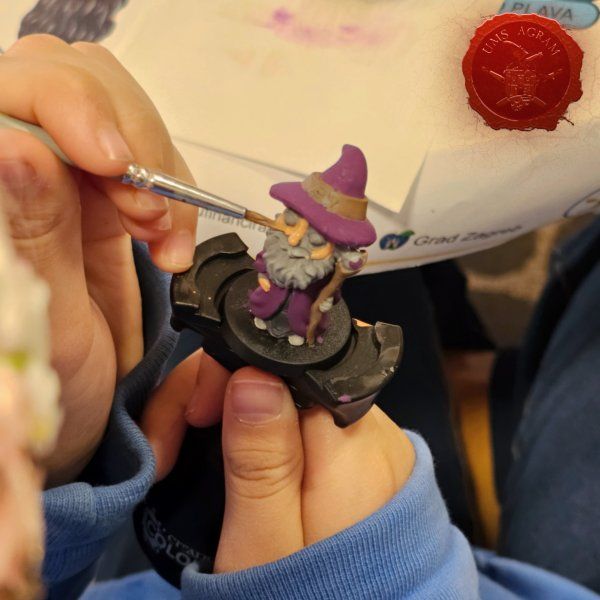
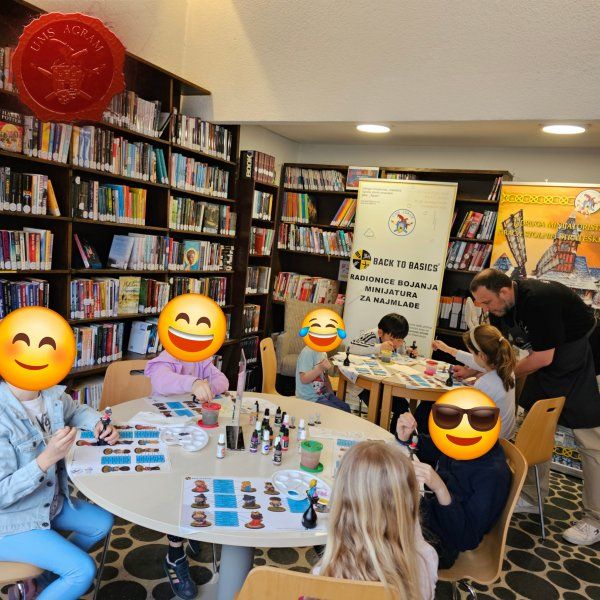
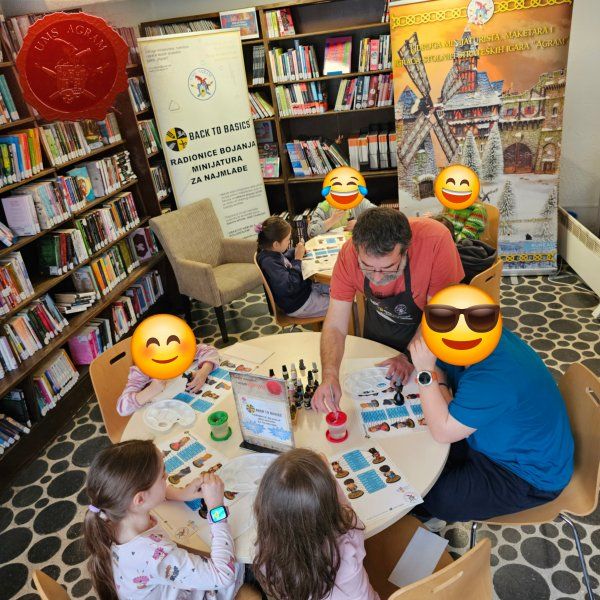
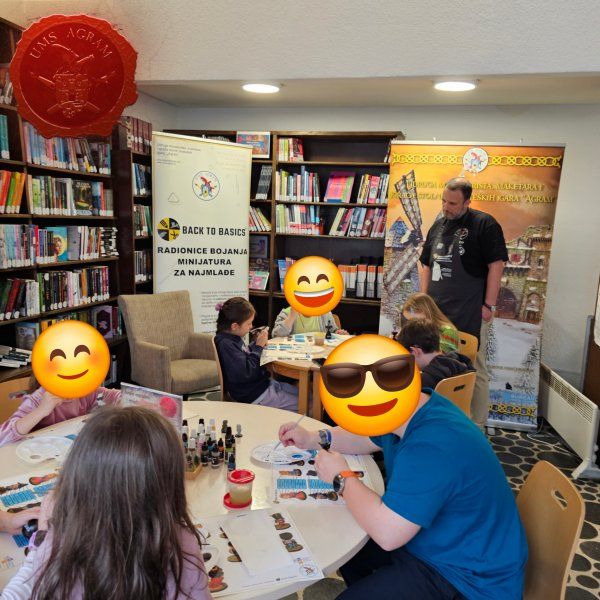
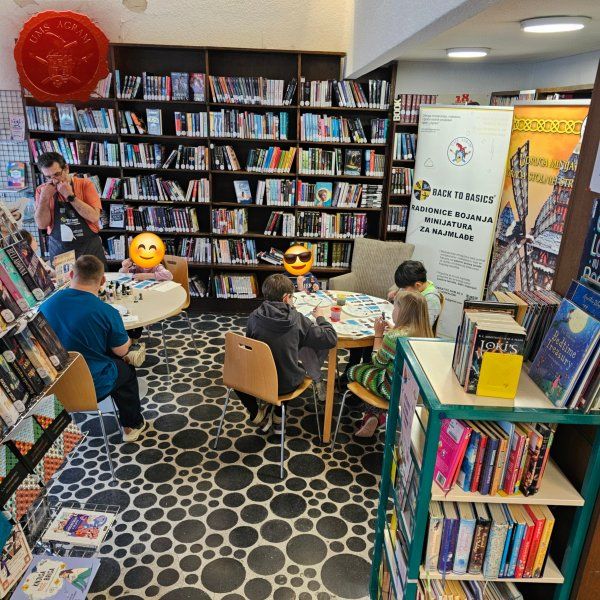
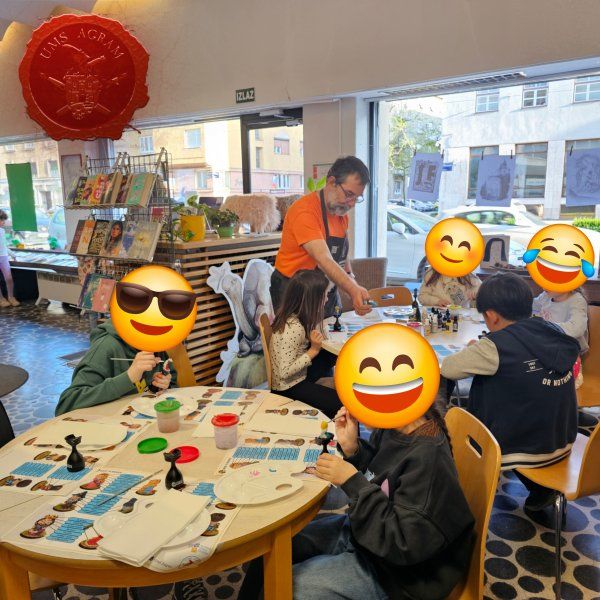
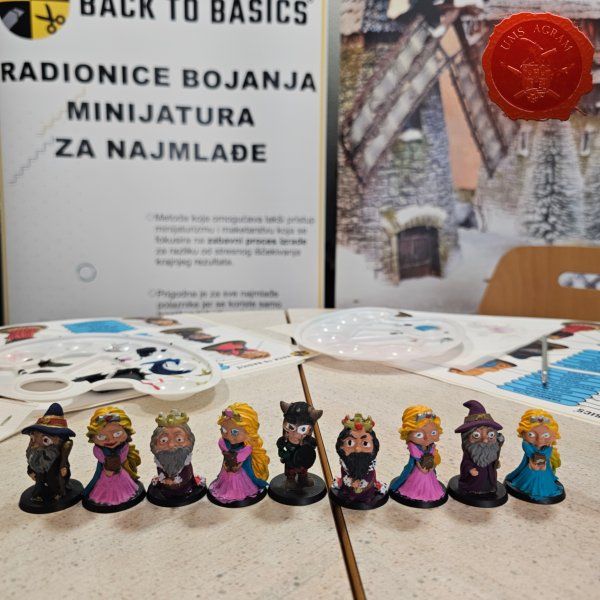
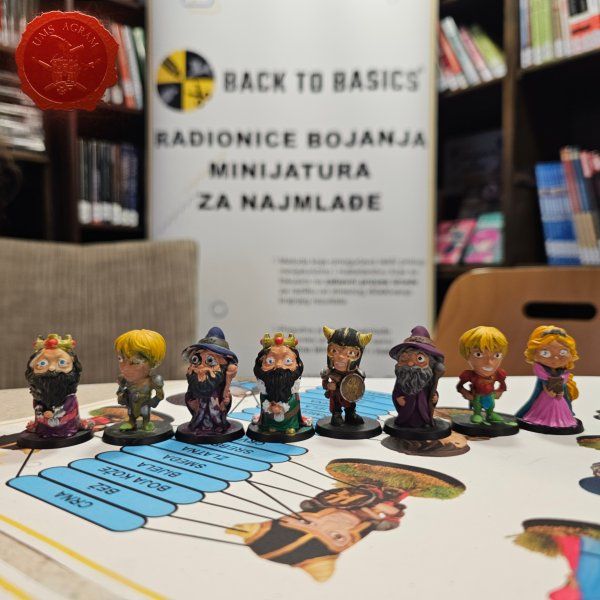
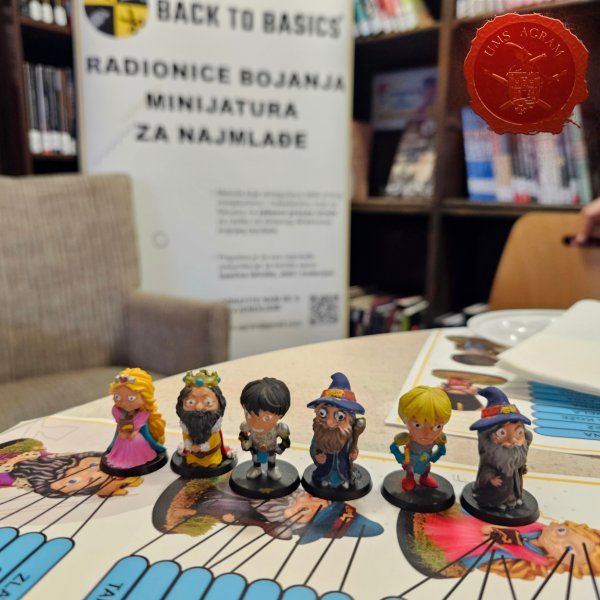
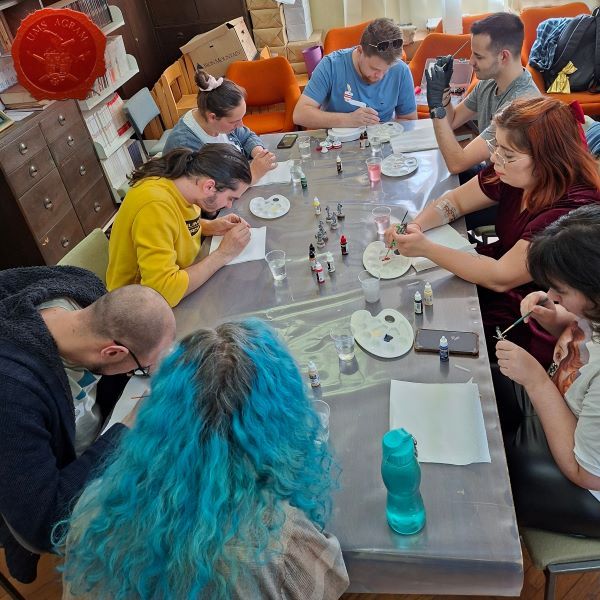
Back to Basics radionice bojenja minijatura za najmlađe u Knjižnici Medveščak
array(2) { ["Article"]=> array(10) { ["id"]=> string(3) "502" ["member_id"]=> string(2) "64" ["title_eng"]=> string(45) "Back to Basics Workshops in Library Medvescak" ["title_hrv"]=> string(81) "Back to Basics radionice bojenja minijatura za najmlađe u Knjižnici Medveščak" ["mask_eng"]=> string(45) "back_to_basics_workshops_in_library_medvescak" ["mask_hrv"]=> string(77) "back_to_basics_radionice_bojenja_minijatura_za_najmlade_u_knjiznici_medvescak" ["content_eng"]=> string(5303) "Krunoslav Belinić, 24.04.2026.In April 2026 we held our Back To Basics miniature painting workshops for the youngest in Medveščak Library.
The workshops were completely FREE for all participants!
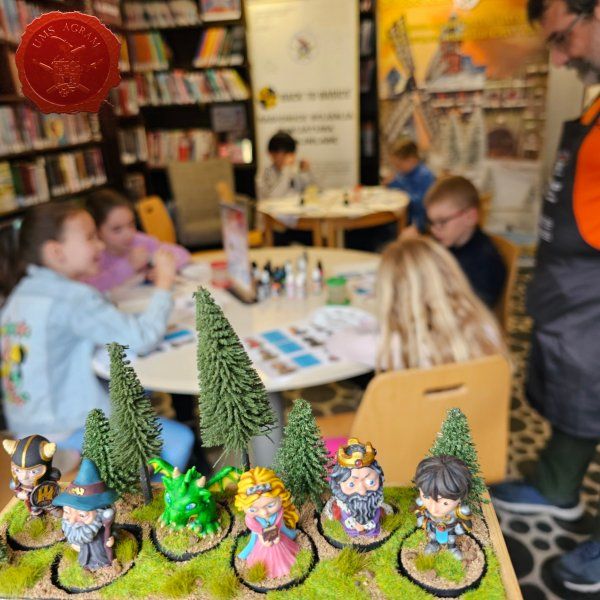
The Back to Basics method is a method of making models and miniatures that focuses on a fun process intended for younger ages, but everyone is welcome! In three separate sessions on Thursdays, participants (aged 7+) painted miniatures of their choice (knight, princess, king, wizard and barbarian).
1st session: Painting miniatures of choice, Thursday, 09.04. - from 18:00 to 19:00
2nd session: Painting a miniature of your choice, Thursday, 16.04. - from 18:00 to 19:00
3rd session: Painting a miniature of your choice, Thursday, 23.04. - from 18:00 to 19:00


" ["content_hrv"]=> string(6834) "
U travnju 2026. održali smo naše Back To Basics radionice za najmlađe u Knjižnici Medveščak.
Radionice su bile BESPLATNE za sve polaznike!
Back to Basics metoda je metoda izrade maketa i minijatura kojoj je fokus na zabavnom procesu namjenjenom mlađim uzrastima, ali svi su dobrodošli! U tri zasebna termina četvrtkom, polaznici (od 7+) su bojali minijature po izboru (vitez, princeza, kralj, čarobnjak i barbarin).
1. termin: Bojenje minijature po izboru, četvrtak, 09.04. - od 18:00 do 19:00
2. termin: Bojenje minijature po izboru, četvrtak, 16.04. - od 18:00 do 19:00
3. termin: Bojenje minijature po izboru, četvrtak, 23.04. - od 18:00 do 19:00
" ["created"]=> string(19) "2026-04-24 08:13:42" ["modified"]=> string(19) "2026-04-24 08:13:42" } ["Member"]=> array(10) { ["id"]=> string(2) "64" ["group_id"]=> string(1) "1" ["first_name"]=> string(9) "Krunoslav" ["last_name"]=> string(8) "Belinić" ["first_name_mask"]=> string(9) "krunoslav" ["last_name_mask"]=> string(7) "belinic" ["username"]=> string(5) "Kruno" ["password"]=> string(40) "eb3fda45fbec0258e90d809803b10491c548b22f" ["born"]=> string(19) "2015-01-18 09:19:00" ["created"]=> string(19) "2015-01-18 09:20:39" } } -
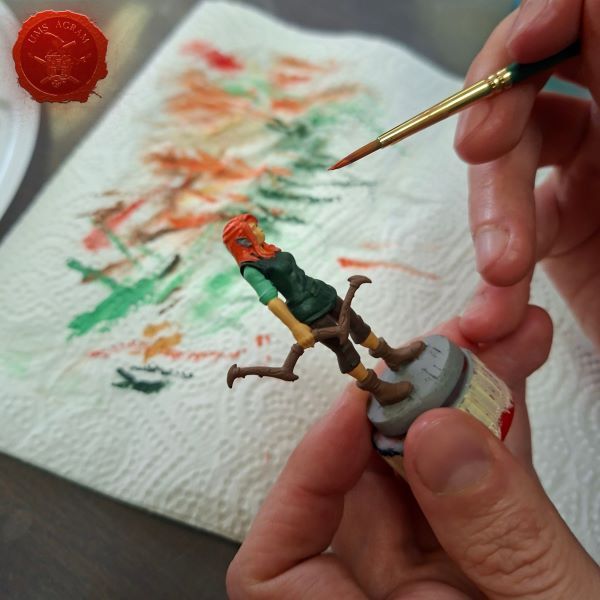
Freehand Proces za Sons of Horus Spartana
array(2) { ["Article"]=> array(10) { ["id"]=> string(3) "501" ["member_id"]=> string(2) "35" ["title_eng"]=> string(35) "Freehand for Sons of Horus Spartana" ["title_hrv"]=> string(41) "Freehand Proces za Sons of Horus Spartana" ["mask_eng"]=> string(35) "freehand_for_sons_of_horus_spartana" ["mask_hrv"]=> string(41) "freehand_proces_za_sons_of_horus_spartana" ["content_eng"]=> string(6110) "Marko Paunović, 20.04.2026.This week, our Miha is working on the "Freehand" technique on Spartan for Sons of Horus for the game Horus Heresy.
I'll explain my process a bit and give some tips if you're interested in trying this technique yourself.
The first step is to find some references, something that we will use as inspiration and a guide for the colors later. It is important to emphasize that we are not trying to copy the drawing 1:1, but rather use it as a starting point and then add our own details.
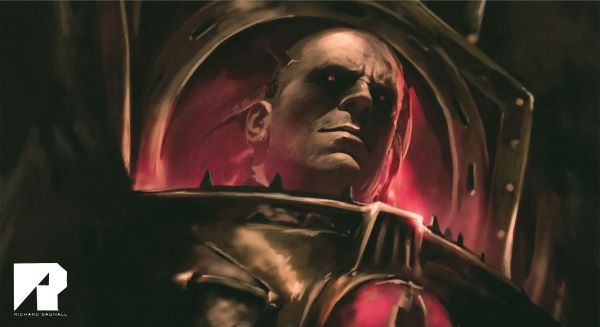
I used a drawing by Richard Bagnall as inspiration, of course you can use your own sketches.
The second step is to define the space and create guides. I recommend using white paint as we will cover these guidelines later. It is important to define the surface we are working with and the important parts of the drawing through the guidelines.
Then we move from the background colors to the foreground colors, in this case reds, then blacks, then golds. Don't worry too much about making it perfect at first, just mark where each color goes and start building a blend from darker to lighter.
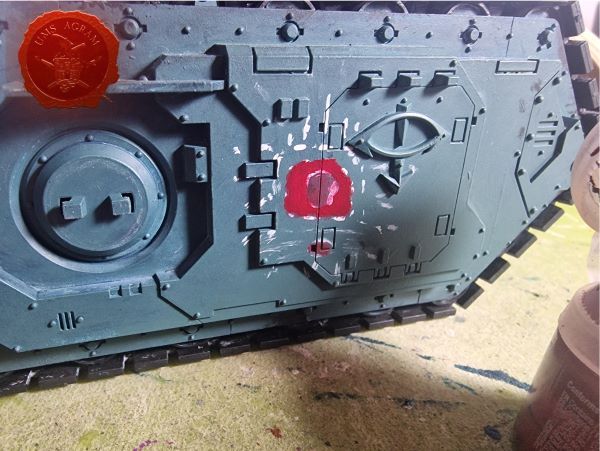
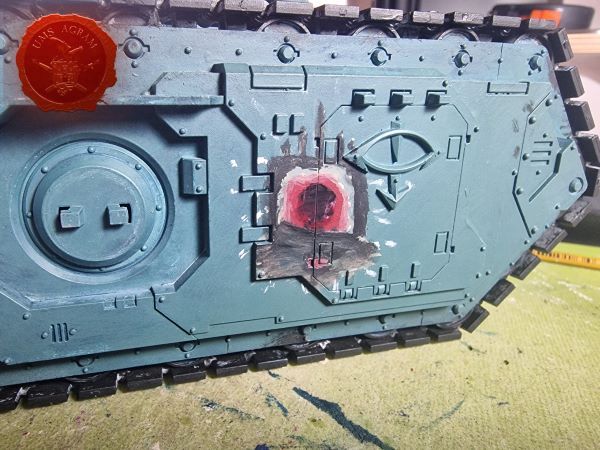
After that, the process of adding details where needed and marking the edges of zones to create light begins. Here I started working on the face, which I later changed the most with more detailed eyes and I tried to make the nose stand out more.
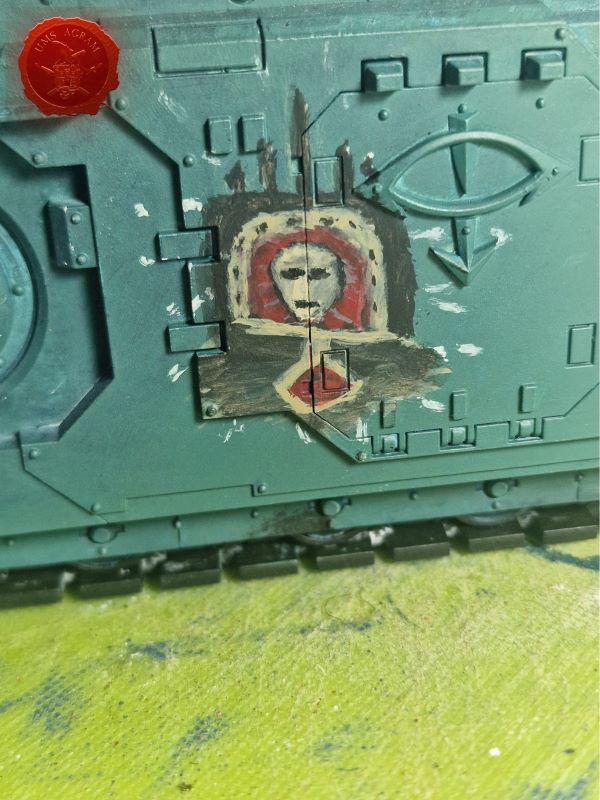
The last step is very long and requires a lot of effort. It's about fixing and adding more details where needed, when painting something detailed in such a small area mistakes will happen, just let it dry a bit and fix it. In the picture you can see how the red has transferred to my face, I fixed that later. I also added more details by using lighter shades of paint in certain areas.
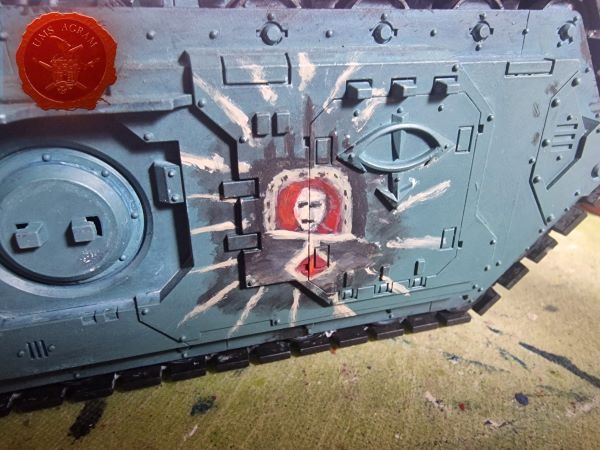
This was the final result, I still tried to add some things, but every time I changed something intentionally, something would change by accident. It's important to know when to accept that a freehand is finished. Your first one won't be perfect, but through practice you will get better and better.
One tip I will give you is to always have an object in your photo that can serve to show the viewer the size of your drawing. Most people I have shown the final image to thought it was a much larger drawing. I like to use coins.
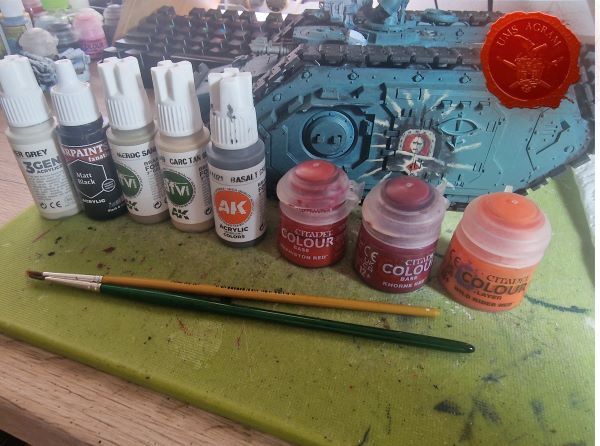
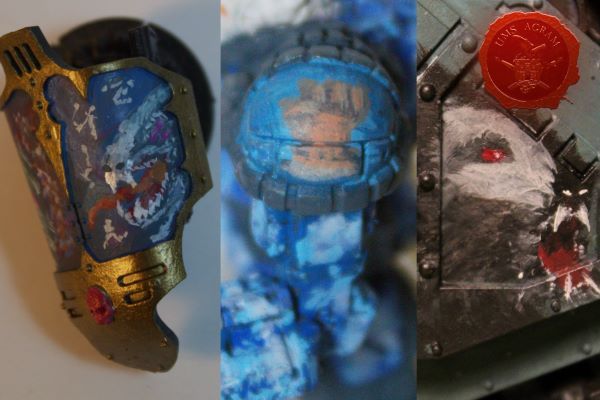
Now, to show you how easy it is to start freehand and what can be achieved through practice, I'll give you two pictures, one of the brushes and paints I used for this project, and the other of some of my other freehands. I'm sure you'll notice the progress over time.
Thank you for reading, I hope I have encouraged you to try the freehand technique on your models.
" ["content_hrv"]=> string(6228) "Naš Miha se ovoga tjedna bavi „Freehand“ tehnikom na Spartanu za Sons of Horus za igru Horus Heresy.
Malo ću objasniti moji proces i dati neke savjete ako ste zainteresirani sami probati ovu tehniku.
Prvi korak je pronaći neki reference, nešto što ćemo koristiti kao inspiraciju i voditelj za boje kasnije. Važno je naglasiti da ne pokušavamo prekopirati crtež 1:1, nego ga koristimo kao početak pa dalje nadodajemo svoje detalje.
Koristio sam crtež od Richard Bagnall-a kao inspiraciju, naravno možete i svoje sketcheve koristiti.
Drugi korak je odrediti prostor i napraviti vodilice. Savjetujem korištenje bijele boje kako ćemo ove vodilice prekriti kasnije. Važno da odredimo površinu s kojom radimo i važne dijelove crteža kroz vodilice.
Nakon toga krećemo od boja u pozadini prema bojama naprijed, u ovom slučaju to su crvene, pa crne, pa zlato. U početku se nemojte previše brinuti da ispadne savršeno, nego samo da označite gdje koje boje idu i da počnete graditi blend od tamnije prema svjetlijoj.
Nakon toga počinje proces dodavanja detalja gdje su potrebni i označavanje rubova zona kako bi stvorili svjetlost. Ovdje sam započeo raditi na licu, koje sam najviše kasnije mijenjao s detaljnijim očima i pokušavao sam više istaknuti nos.
Zadnji korak je jako dugačak i zahtjeva dosta truda. To je popravljanje i dodavanje još detalje gdje je potrebno, kada bojate nešto detaljno na ovako malom prostoru dogodit će se greške, jednostavno pustite da se malo osuši i popravite. U slici možete vidjeti kako mi je crvena prešla na lice, to sam kasnije popravio. Također sam dodao još detalja koristeći svjetlije nijanse boja na određenim dijelovima.
Ovo je bio finalni rezultat, još sam pokušao nadodati neke stvari, ali svaki put kad bi nešto mijenjao namjerno, nešto bi se promijenilo slučajno. Važno je znati kada treba prihvatiti da je freehand gotov. Prvi vam neće biti savršen, ali kroz vježbu ćete postati sve bolji i bolji.
Jedan savjet koji ću vam dati je da uvijek imate neki objekt u fotografiji koji može služiti da se gledatelju prikaže veličina vašeg crteža. Većina kojoj sam pokazao finalu sliku su mislili da je to dosta veći crtež. Ja volim koristiti kovanice.
Sada, da prikažem koliko je lagano krenuti s freehandom i što se može postići kroz vježbu, ću vam dati dvije slike, jedna su kistovi i boje koje sam koristio za ovaj projekt, a druga su neki drugi moji freehandovi. Siguran sam da ćete primjetiti napredak s vremenom.
Hvala vam na čitanju, nadam se da sam vas potaknuo da probate freehand tehniku na svojim modelima.
" ["created"]=> string(19) "2026-04-20 07:42:58" ["modified"]=> string(19) "2026-04-20 07:42:58" } ["Member"]=> array(10) { ["id"]=> string(2) "35" ["group_id"]=> string(1) "1" ["first_name"]=> string(5) "Marko" ["last_name"]=> string(9) "Paunović" ["first_name_mask"]=> string(5) "marko" ["last_name_mask"]=> string(8) "paunovic" ["username"]=> string(5) "marko" ["password"]=> string(40) "3bd37b326d19d1880d3b93a4b32e8fb3a90fa122" ["born"]=> string(19) "2033-03-07 20:35:00" ["created"]=> string(19) "2009-06-02 20:37:03" } } -
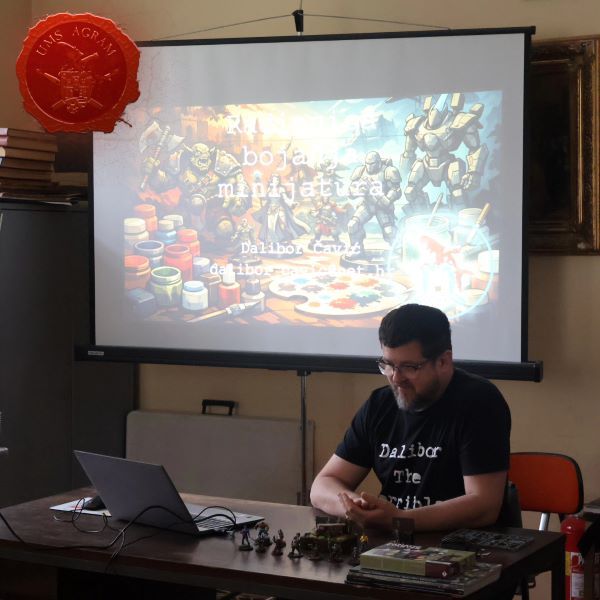
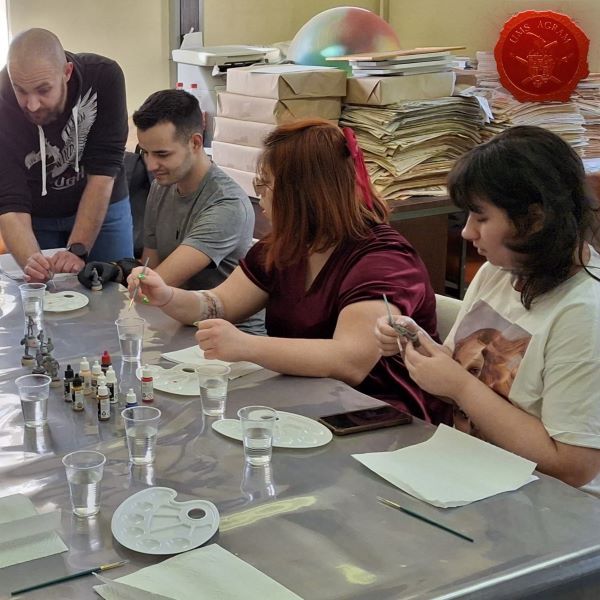
Radionica bojanja minijatura u Bjelovaru
array(2) { ["Article"]=> array(10) { ["id"]=> string(3) "500" ["member_id"]=> string(2) "95" ["title_eng"]=> string(39) "Miniature Painting Workshop in Bjelovar" ["title_hrv"]=> string(40) "Radionica bojanja minijatura u Bjelovaru" ["mask_eng"]=> string(39) "miniature_painting_workshop_in_bjelovar" ["mask_hrv"]=> string(40) "radionica_bojanja_minijatura_u_bjelovaru" ["content_eng"]=> string(6765) "Dalibor Čavić, 14.04.2026.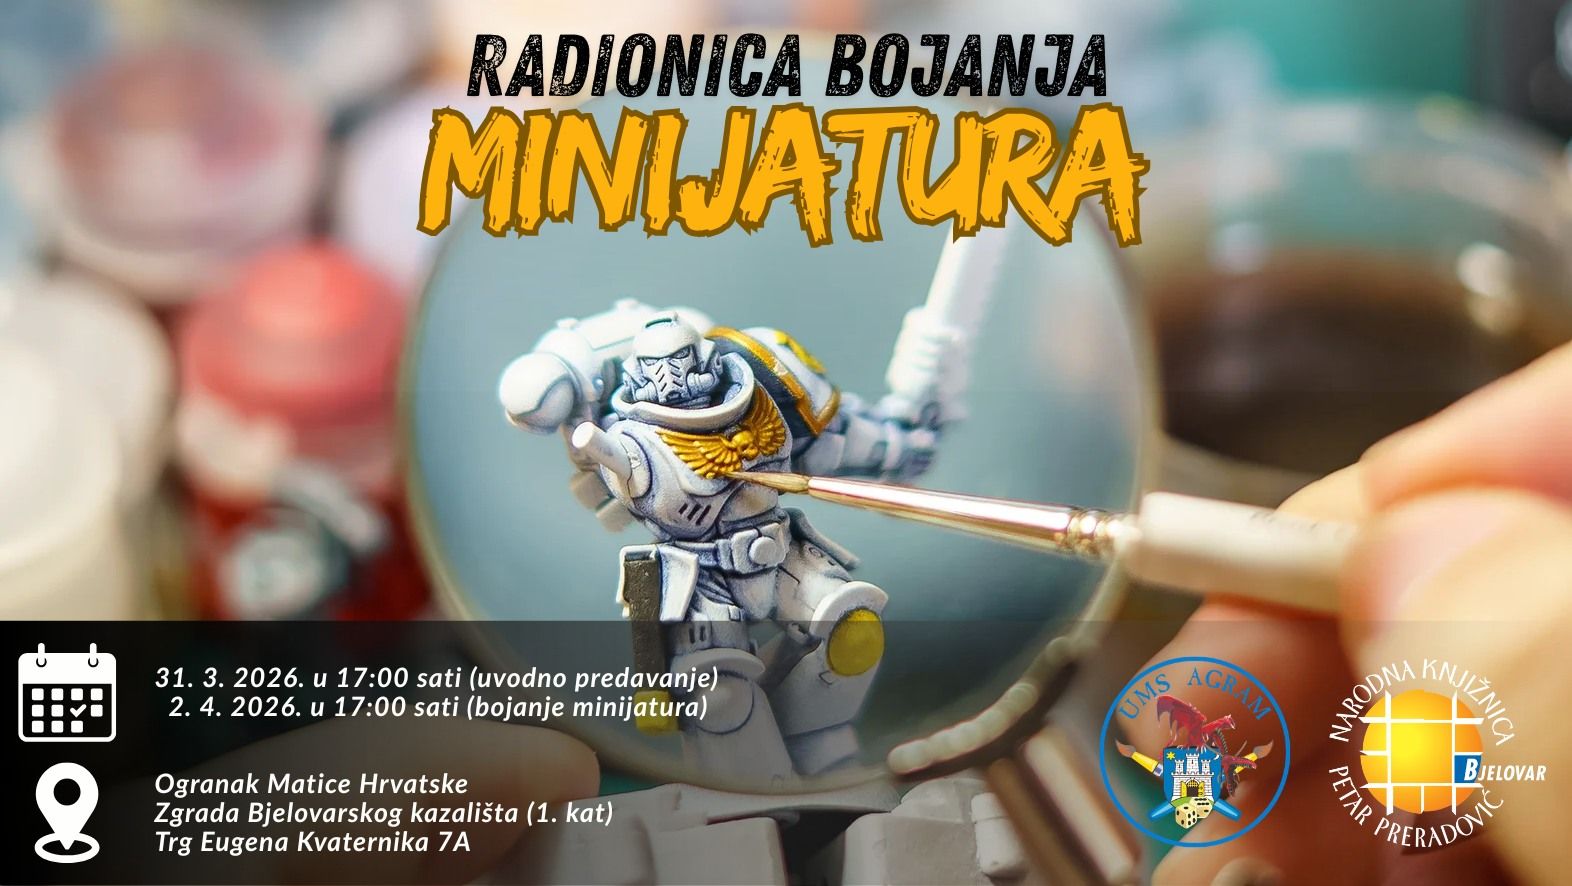
At the end of March and beginning of April, we held our first miniature painting workshop in Bjelovar. We held them in cooperation with the "Petar Preradović" National Library from Bjelovar, to which we would like to once again thank for the opportunity to demonstrate our hobby to young people in this city.
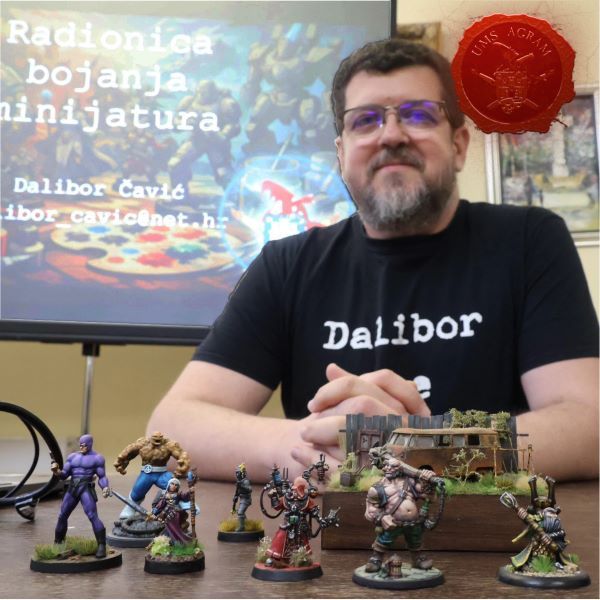
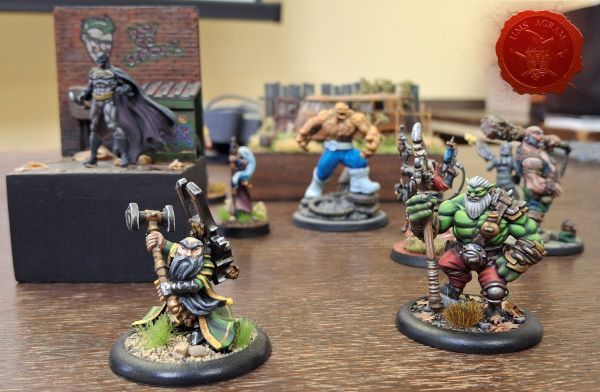
The first, introductory workshop was led by our Dalibor Čavić, the original creator of this series of workshops. He showed the attendees some of his work and explained the theory behind basic miniature painting in an interesting one-hour lecture.
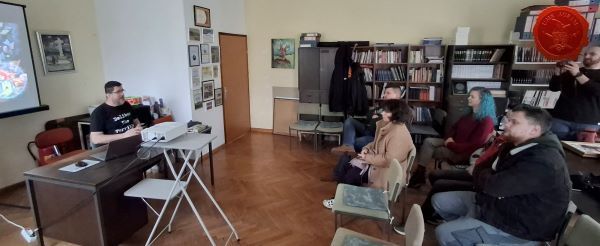
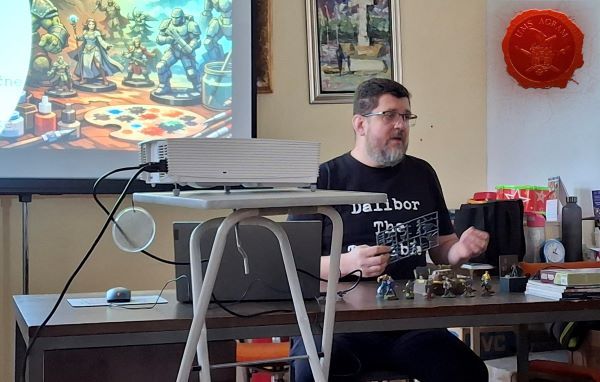
Due to Dalibor's illness, our Dean Vuković stepped in to lead the second workshop. The second session was reserved for the practical application of the acquired knowledge.
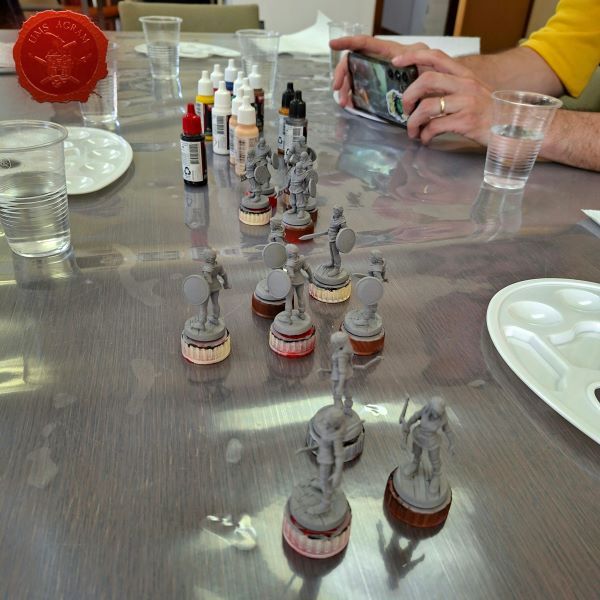
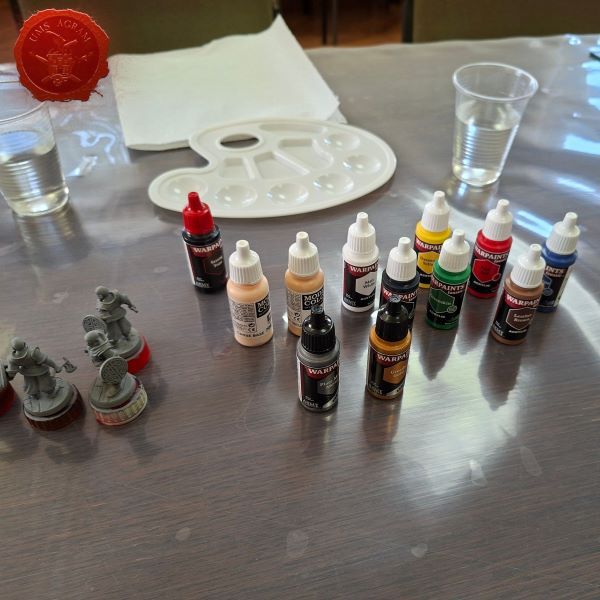
Eight participants had the opportunity to paint miniatures provided by the Association, but some decided to paint their own miniatures, which Dean naturally made possible.
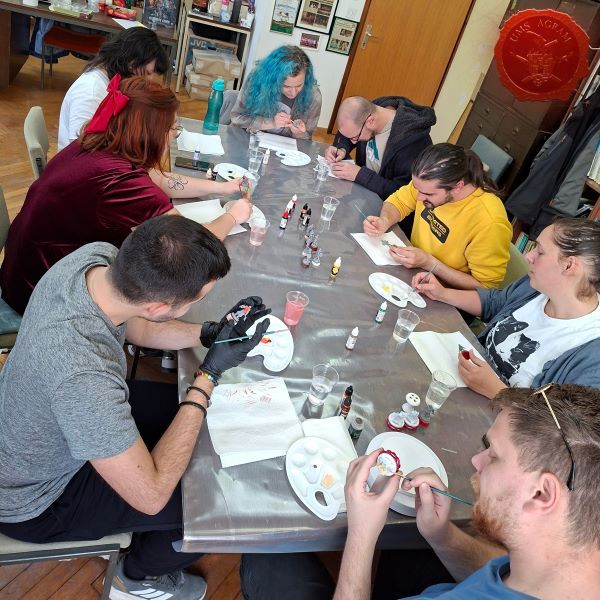
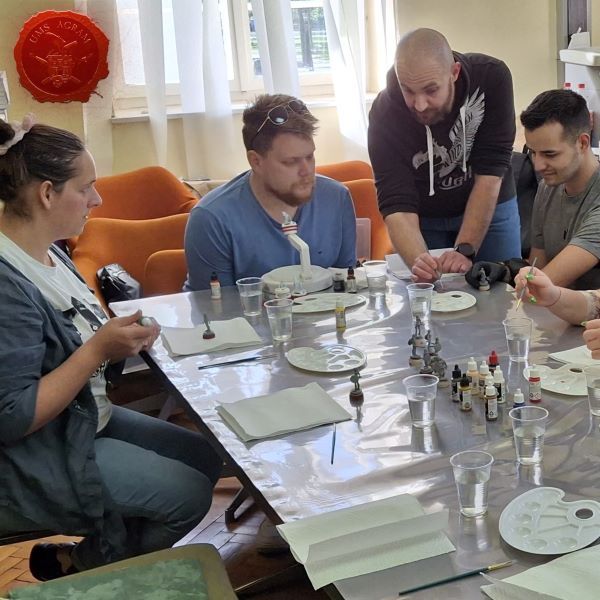
See you soon again in Bjelovar!
" ["content_hrv"]=> string(6737) "Krajem ožujka i početkom travnja održali smo prve radionice bojanja minijatura u Bjelovaru. Održali smo ih u suradnji sa Narodnom knjižnicom "Petar Preradović" iz Bjelovara kojoj se ovim putem još jednom zahvaljujemo na prilici da demonstriramo naš hobi mladima u ovom nama bliskom gradu.
Prvu, uvodnu radionicu je vodio naš Dalibor Čavić, idejni začetnik ovog serijala radionica. Prisutnima je pokazao neke od svojih radova i objasnio teoriju iza osnovnog bojanja minijatura u zanimljivom jednosatnom predavanju.
Za vođenje druge radionice, uskočio je naš Dean Vuković zbog bolesti Dalibora. Drugi termin bio je rezerviran za praktičnu primjenu stečenih znanja.
Osam polaznika imalo je priliku bojati minijature koje je Udruga osigurala, ali neki su odlučili bojati i vlastite minijature što im je voditelj naravno omogućio.
Vidimo se uskoro opet u Bjelovaru!
" ["created"]=> string(19) "2026-04-14 08:05:13" ["modified"]=> string(19) "2026-04-14 08:05:13" } ["Member"]=> array(10) { ["id"]=> string(2) "95" ["group_id"]=> string(1) "2" ["first_name"]=> string(7) "Dalibor" ["last_name"]=> string(7) "Čavić" ["first_name_mask"]=> string(7) "dalibor" ["last_name_mask"]=> string(5) "cavic" ["username"]=> string(6) "Tvrtko" ["password"]=> string(0) "" ["born"]=> string(19) "2019-04-04 18:51:00" ["created"]=> string(19) "2019-04-04 18:51:50" } } -
Hobby trgovine u Japanu
array(2) { ["Article"]=> array(10) { ["id"]=> string(3) "499" ["member_id"]=> string(2) "35" ["title_eng"]=> string(21) "Hobby Stores in Japan" ["title_hrv"]=> string(23) "Hobby trgovine u Japanu" ["mask_eng"]=> string(21) "hobby_stores_in_japan" ["mask_hrv"]=> string(23) "hobby_trgovine_u_japanu" ["content_eng"]=> string(8238) "Marko Paunović, 08.04.2026.Last year our Ili went to Japan and was kind enough to write a short story about the hobby stores she visited while there.
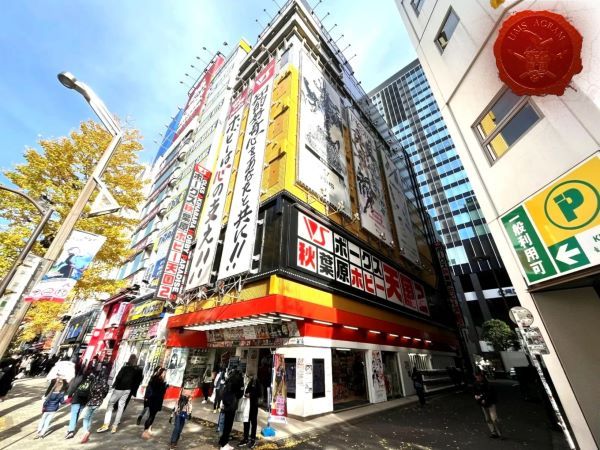
I was 3 weeks in Japan and being a geeky (and admittedly an Otaku), of course I spent most of my time there at the famous Akihabara.
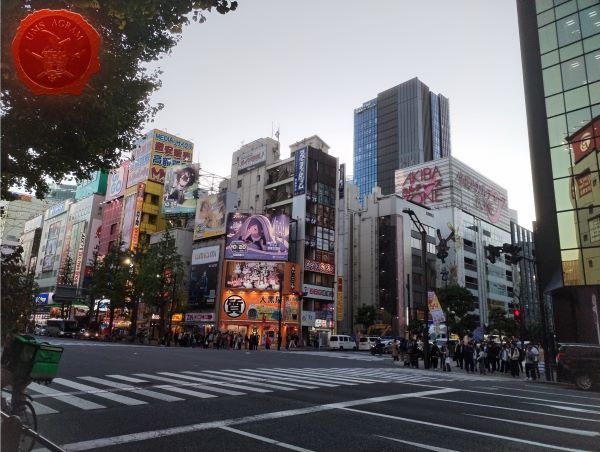
Akihabara Electric Town or simply Akihabara is a district in central Tokyo that is famous for its many electronics shops and has also gained recognition as the center of Japan's otaku culture. You can find everything ranging from practical electronics models or parts to gaming and anime merchandise and of course model kits and miniatures.
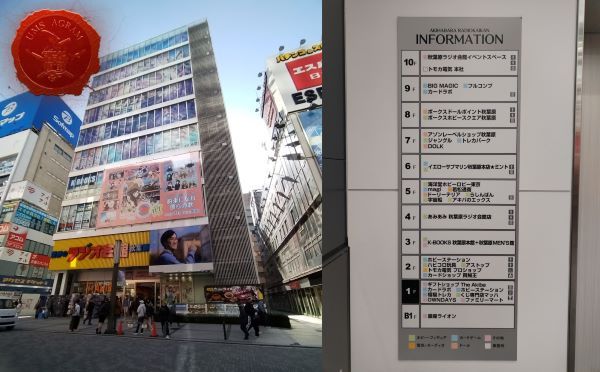
What my partner and I didn’t expect is that all stores here are at least 5 floors and the most I know have even 10 floors! Above is probably the most famous building in Akihabara, the Akihabara Radio Kaikan. The building is 46.5 m high, is ten levels from the ground floor and has two basement levels. The current building primarily hosts stores selling otaku goods.
While above photos are inside Akihabara Radio Kaikan, but these are how most buildings/stores in Akhabara look like.
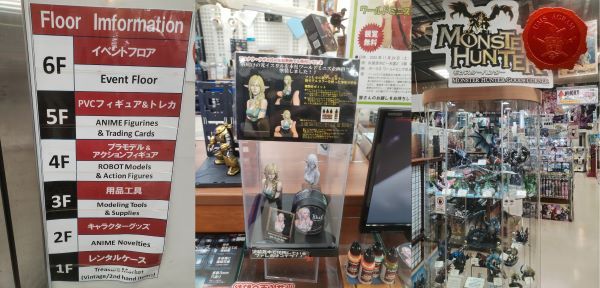
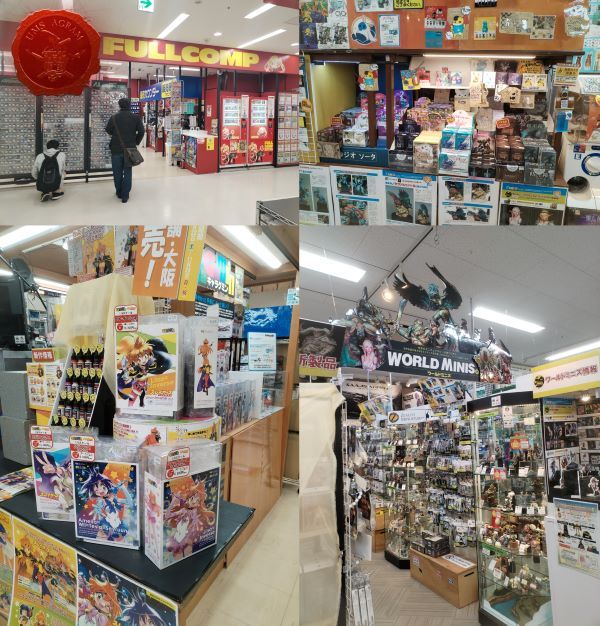
Since we are about building and painting miniature models, the place you MUST visit is VOLKS AKIHABARA HOBBY PARADISE 2 (Hobby Paradise 2) - it is a dream destination for every hobbyist. This massive seven-floor store is filled with everything from character goods and figures to model kits, tools, paints, and more.
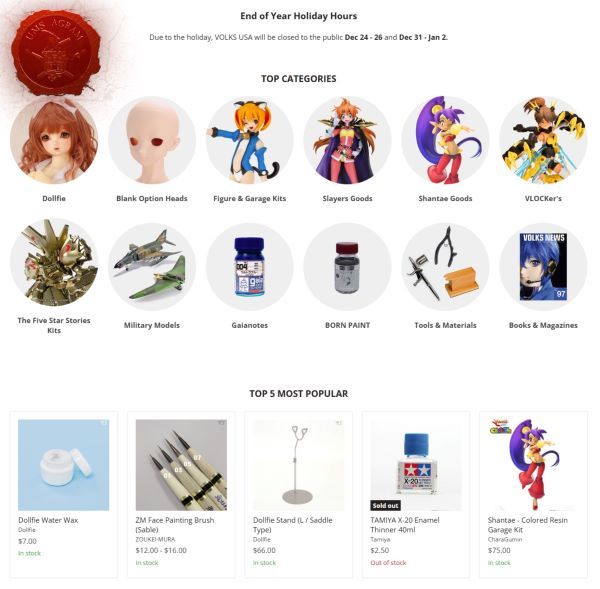
On the topic of Volks, it began as a small hobby shop in 1972. In the late 1990s they produced the first Dollfie dolls, and in 1999 the first Super Dollfie doll was created by Akihiro Enku. In November 2005, Volks USA opened their first American Tenshi no Sumika store in Los Angeles, California.
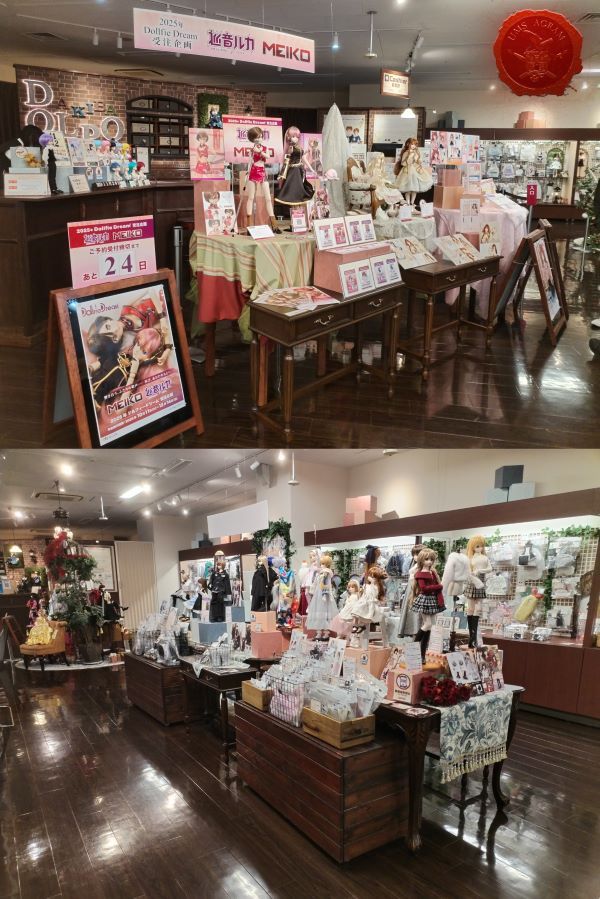
We are going to talk a bit about Dollfie. Dollfie dolls were customization tools such as pre-rooted hair and stick-on eye decals. Later, complete dolls were released. There are various body types, male and female, with several forms and skin tones for both as well as a line of child-sized dolls. The company also produces tools and materials to customize and maintain dolls.
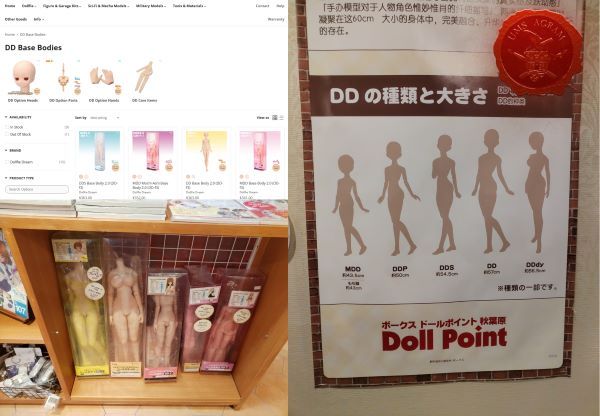
Basically they are almost like customising and painting miniature but on a bigger scale. This is a hobby I have had since 2005 (but only become very active in 2017).
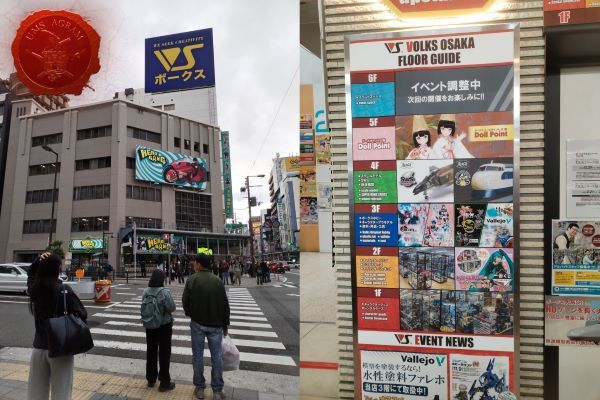
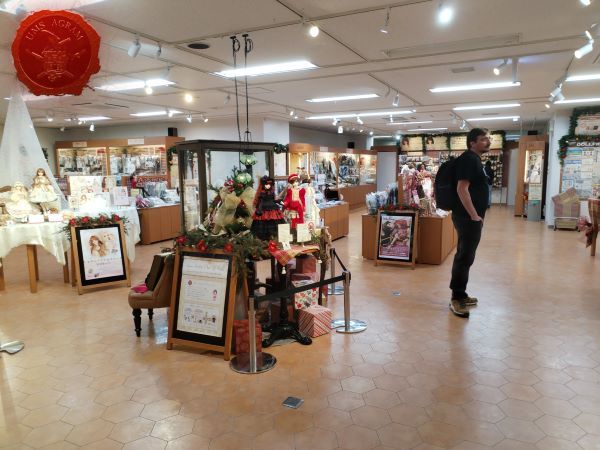
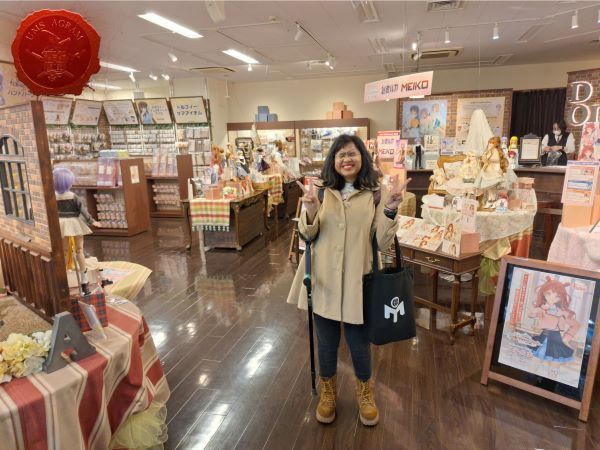
Volks store in Osaka - Volks Osaka Showroom.
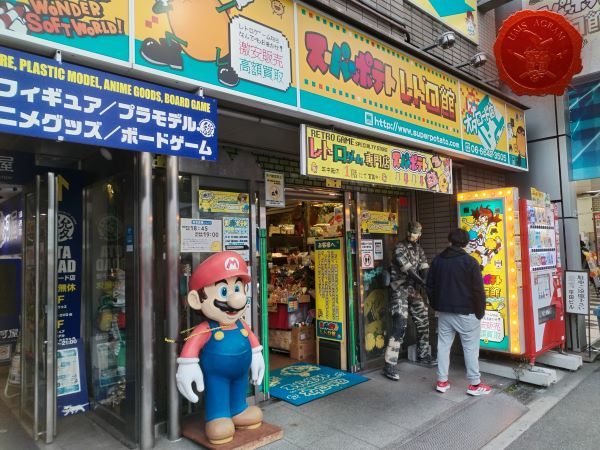

One place you need to visit if you're into retro gaming is SUPER POTATO! They have 6 stores total, one is in Akihabara, Tokyo and the one in Nipponbashi, Osaka is a lot bigger and has more things to offer. All the photos I shared above are from the Osaka branch. Super Potato had been referred by many as "a museum as much as a shop" based on how visitors serendipitously interact with the games on display.
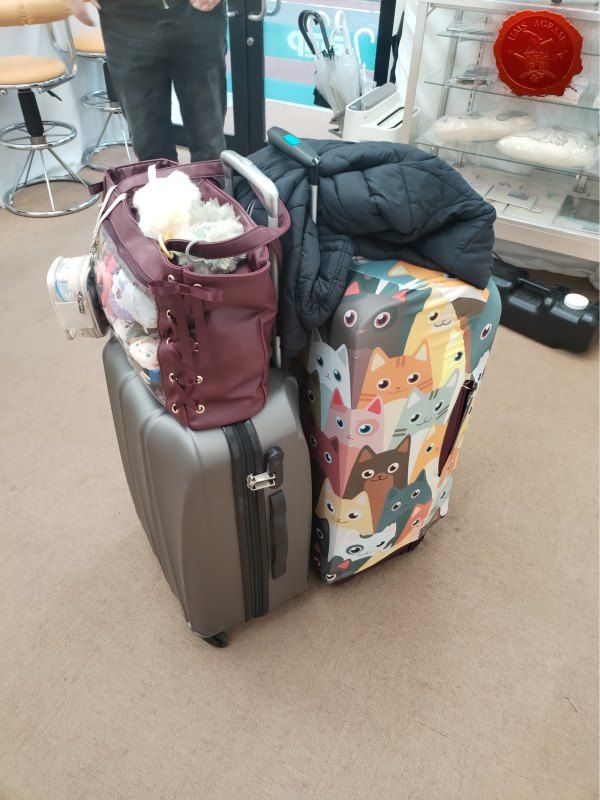
And a cliche as they say, you always leave Japan with more luggage (or bags). We came to Japan with just one piece of luggage and 2 backpacks on us.
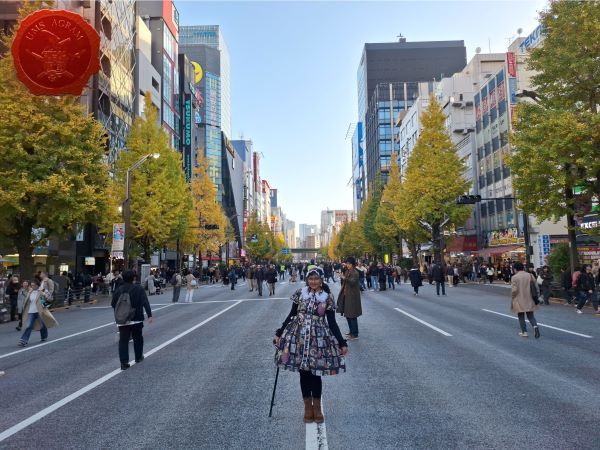
" ["content_hrv"]=> string(8311) "Prošle godine naša Ili je bila u Japanu i bila je toliko ljubazna da je napisala kratku priču o hobby trgovinama koje je posjetila dok je bila tamo.
Bila sam 3 tjedna u Japanu i, budući da sam geeky (i priznajem otaku), naravno da sam većinu vremena provela tamo u poznatoj Akihabari.
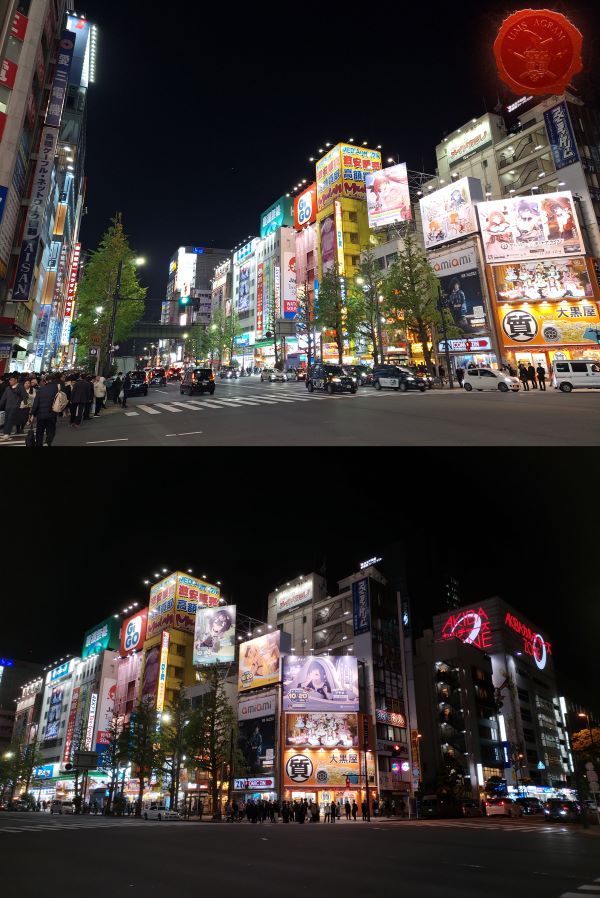
Akihabara Electric Town ili jednostavno Akihabara je četvrt u središnjem Tokiju poznata po brojnim trgovinama elektronikom, a stekla je i priznanje kao središte japanske otaku kulture. Možete pronaći sve, od praktičnih modela ili dijelova elektronike do igraće i anime robe, pa sve do kompleta modela i minijatura.
Ono što moj partner i ja nismo očekivali jest da sve trgovine ovdje imaju barem 5 katova, a većina koje poznajem ima čak 10 katova! Iznad je vjerojatno najpoznatija zgrada u Akihabari, Akihabara Radio Kaikan. Zgrada je visoka 46,5 m, nalazi se na deset katova od prizemlja i ima dva podrumska kata. U sadašnjoj zgradi se uglavnom nalaze trgovine koje prodaju otaku robu.
Iako su gornje fotografije unutar Akihabara Radio Kaikana, ovako izgleda većina zgrada/trgovina u Akhabari.
Budući da se bavimo izradom i bojanjem minijaturnih modela, mjesto koje MORATE posjetiti je VOLKS AKIHABARA HOBBY PARADISE 2 (Hobby Paradise 2) - to je destinacija iz snova za svakog hobista. Ova ogromna trgovina na sedam katova puna je svega, od robe s likovima i figurama do maketa, alata, boja i još mnogo toga.
Što se tiče Volksa, započeo je kao mala hobi trgovina 1972. Krajem 1990-ih proizveli su prve Dollfie lutke, a 1999. Akihiro Enku stvorio je prvu Super Dollfie lutku. U studenom 2005. Volks USA otvorio je svoju prvu američku trgovinu Tenshi no Sumika u Los Angelesu u Kaliforniji.
Pisat ću malo o Dollfieju. Dollfie lutke bile su alati za prilagodbu poput unaprijed ukorijenjene kose i naljepnica za oči koje se samoljepe. Kasnije su izdane i gotove lutke. Postoje različiti tipovi tijela, muški i ženski, s nekoliko oblika i tonova kože za oboje, kao i linija lutaka dječje veličine. Tvrtka također proizvodi alate i materijale za prilagodbu i održavanje lutaka.
U osnovi su gotovo kao prilagodba i bojanje minijatura, ali u većoj skali. Ovo je hobi koji prakticiram od 2005. (ali sam postala vrlo aktivna tek 2017.).
Volks trgovina u Osaki - Volks Osaka Showroom.
Jedno mjesto koje morate posjetiti ako volite retro igre je SUPER POTATO! Imaju ukupno 6 trgovina, jedna je u Akihabari u Tokiju, a ona u Nipponbashiju u Osaki je puno veća i ima više toga za ponuditi. Sve fotografije koje sam podijelila gore su iz podružnice u Osaki. Super Potato su mnogi nazivali "muzejem koliko i trgovinom" na temelju načina na koji posjetitelji slučajno komuniciraju s izloženim igrama.
I klišej kako kažu, uvijek napuštaš Japan s više prtljage (ili torbi). Mi smo u Japan došli samo s jednim komadom prtljage i dva ruksaka.
" ["created"]=> string(19) "2026-04-08 08:51:21" ["modified"]=> string(19) "2026-04-08 08:51:21" } ["Member"]=> array(10) { ["id"]=> string(2) "35" ["group_id"]=> string(1) "1" ["first_name"]=> string(5) "Marko" ["last_name"]=> string(9) "Paunović" ["first_name_mask"]=> string(5) "marko" ["last_name_mask"]=> string(8) "paunovic" ["username"]=> string(5) "marko" ["password"]=> string(40) "3bd37b326d19d1880d3b93a4b32e8fb3a90fa122" ["born"]=> string(19) "2033-03-07 20:35:00" ["created"]=> string(19) "2009-06-02 20:37:03" } }


Najnoviji izvještaji s bojišta
- Kill Team - Blooded vs. Vespid Stingwings 28.02.2025., GW - Warhammer 40.000, i Antoni Pastuović (Imperial Guard)
- Dark Angels protiv T'au Battlereport 22.04.2022., GW - Warhammer 40.000, Borna Pleše (Space Marines) i Kristijan Kliska (Tau Empire)
- Sisters of Battle protiv Ultramarines 17.11.2021., GW - Warhammer 40.000, i Nino Marasović (Space Marines)