Članovi
- Krunoslav Belinić, Izvršni odbor, Dopredsjednik
- Uroš Brkić
- Jure Cukar
- Mislav Gorupec
- Mario Grgurev, Nadzorni odbor, Sud časti
- Goran Jelinek, Počasni članovi
- Andrija Jurišić
- Kristijan Kliska
- Ivan Knezović
- Miha Kolarić
- Novi Korisnik10
- Novi Korisnik7
- Novi Korisnik8
- Novi Korisnik9
- Matija Koružnjak
- Domagoj Krpan, Izvršni odbor
- Goran Krunić
- Matija Lacković
- Nino Marasović
- Antoni Pastuović, Nadzorni odbor
- Marko Paunović, Izvršni odbor, Rizničar, Predsjednik, Sud časti
- Dejan Pavlović
- Valentino Pemma, Počasni članovi
- Tomislav Petrović
- Borna Pleše
- Ana Polanšćak
- Tomislav Rac
- Giorgio Rizzarelli, Počasni članovi
- Ili Said
- Dunja Singer
- Sebastian Søgård
- Adam Troke, Počasni članovi
- Berislav Tušek
- Ivan Vedak
- Martin Vrkljan
- Dalibor Čavić
Najnoviji članci
-
Agram Group Build #7 – Amon Hen, dio 6
array(2) { ["Article"]=> array(10) { ["id"]=> string(3) "532" ["member_id"]=> string(2) "35" ["title_eng"]=> string(39) "Agram Group Build #7 – Amon Hen, pt.6" ["title_hrv"]=> string(40) "Agram Group Build #7 – Amon Hen, dio 6" ["mask_eng"]=> string(32) "agram_group_build_7_amon_hen_pt6" ["mask_hrv"]=> string(34) "agram_group_build_7_amon_hen_dio_6" ["content_eng"]=> string(7024) "Marko Paunović, 22.10.2026.Agram Group Build is back. For this seventh installment, the team decided to create a gaming board/diorama for Amon Hen. To that end, we fulfilled a childhood dream and acquired the original Forge World Amon Hen terrain (released around 2000) along with the accompanying set of miniatures. This series of articles will document the entire project—from crafting the terrain to assembling and painting the miniatures.
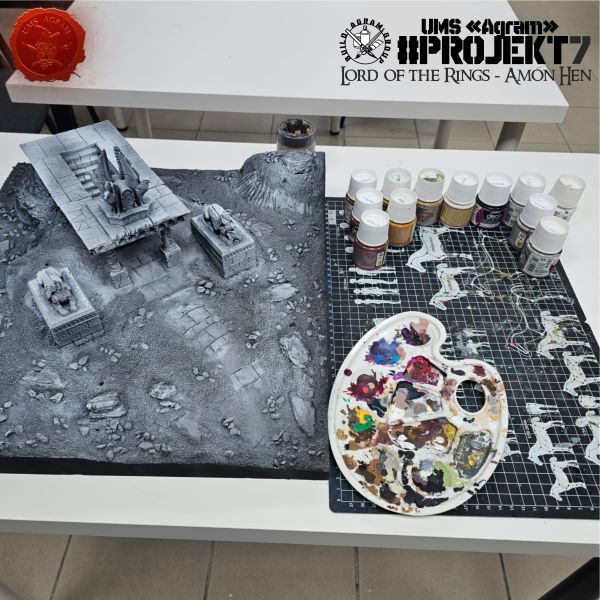
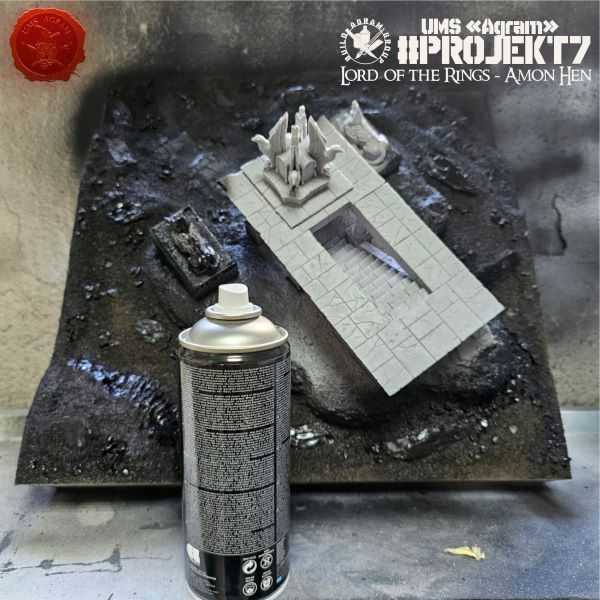
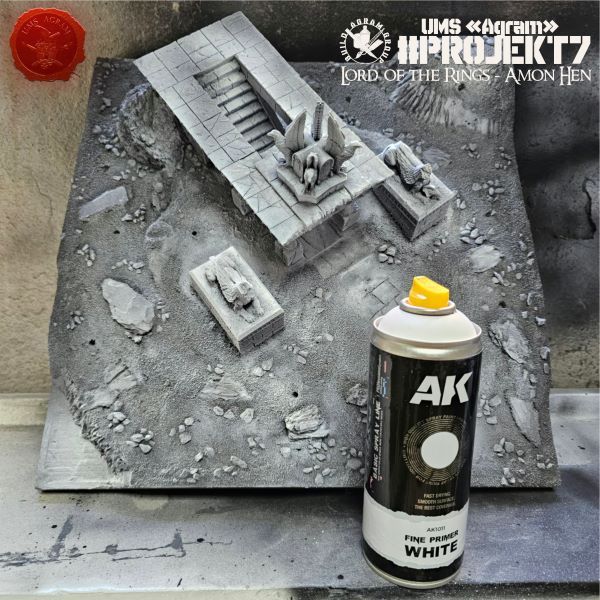
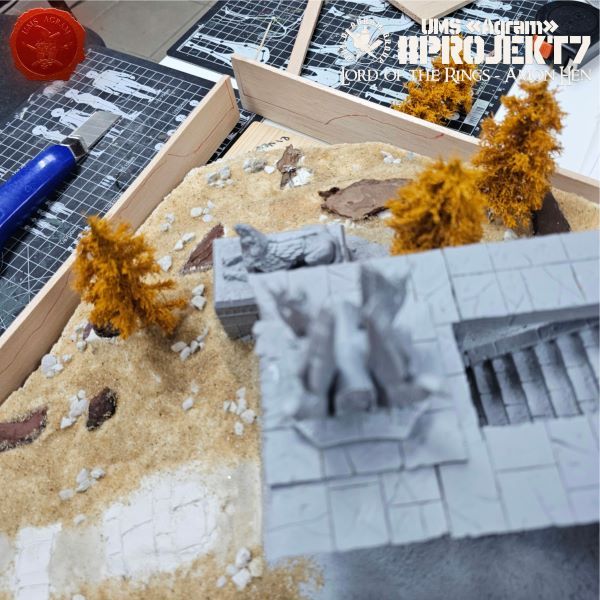
As we announced, this time we are starting with the painting process. The first step was applying a black primer (via spray), followed by white to highlight the details.
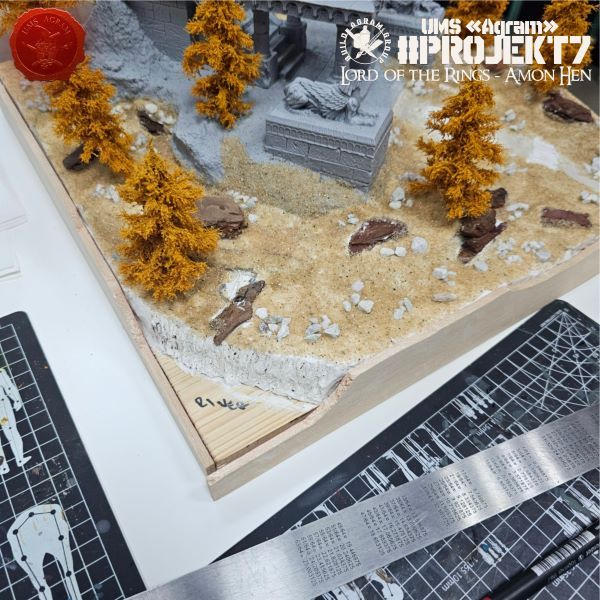
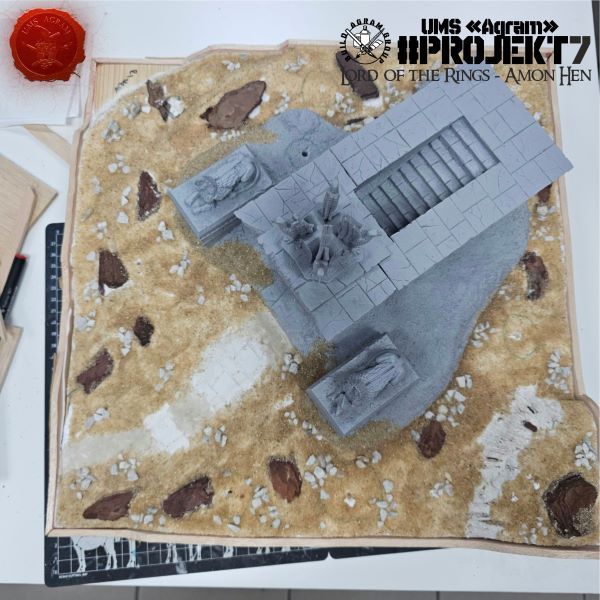
Next came the painting of the terrain. As always, we used a palette of brown and gray paints from the Pebeo Deco brand. These are acrylic paints—relatively affordable and quite thick—which allow for easy coverage or a quick drybrush, should the need arise. We started with the brown tones, beginning with the darker shades and finishing with the lighter ones.
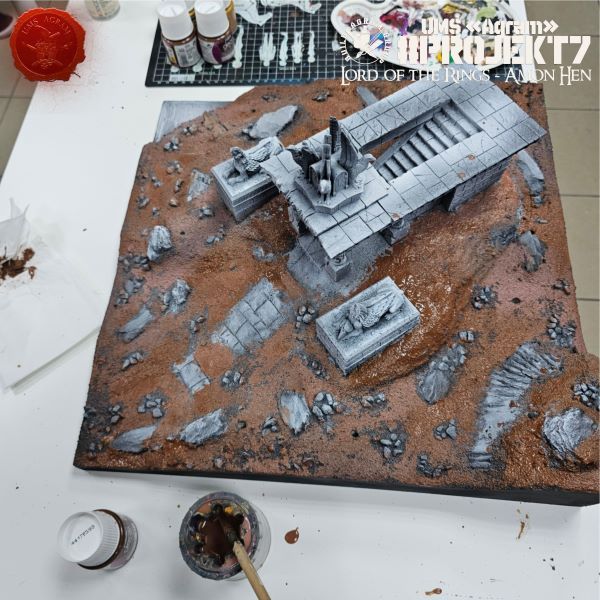
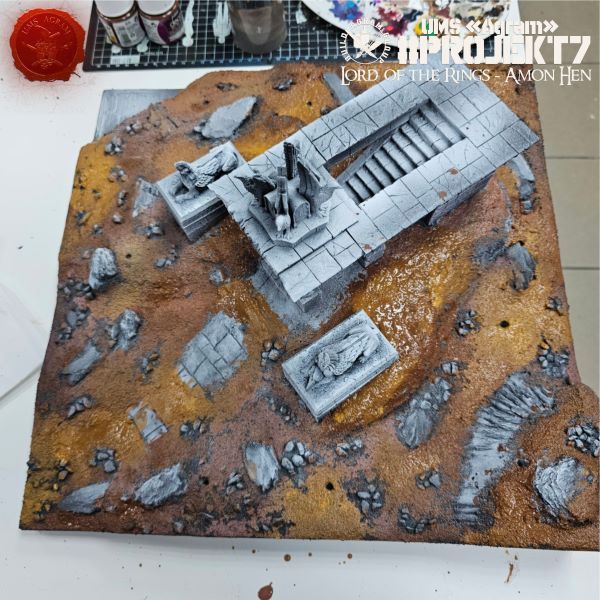
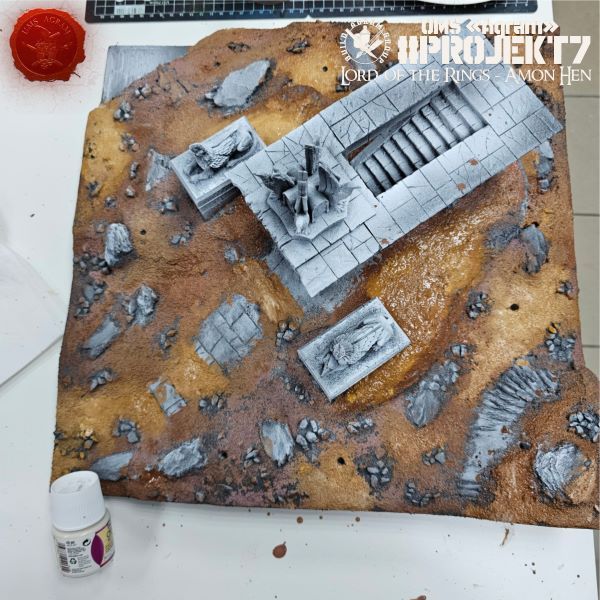
Next, we highlighted the stone surfaces with black paint, then lightened them using shades of gray, ranging from darker to lighter tones. We left the temple and the statues covered only with the spray paints applied in the first step.
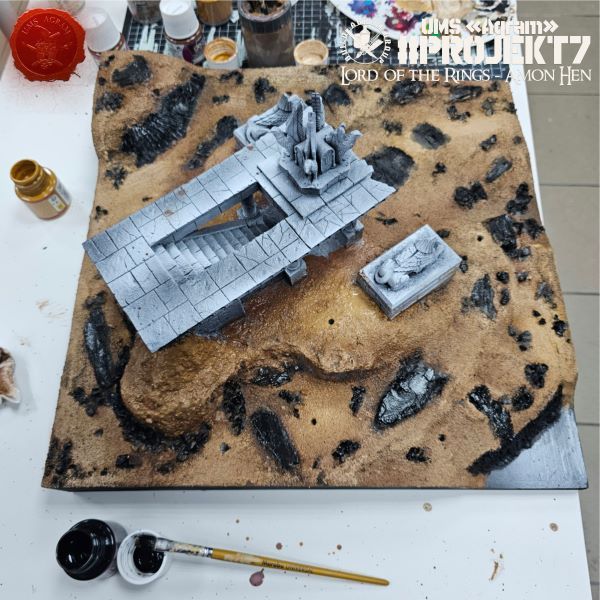
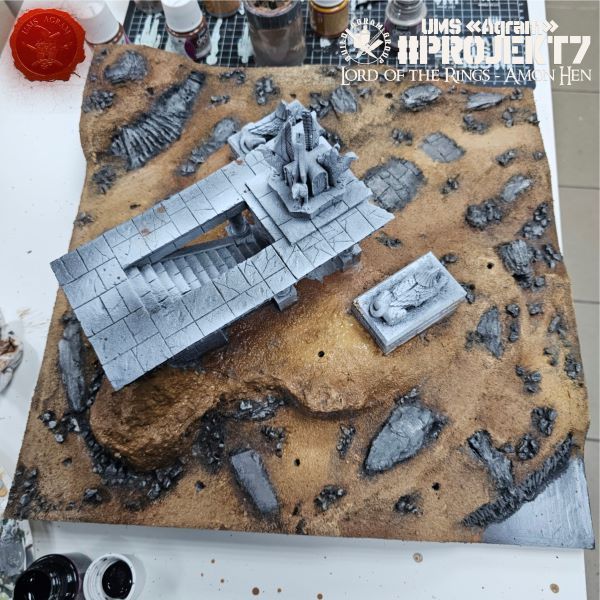
Once the base was finished, we turned our attention to the temple and the statues. The first layer of paint we applied over the black-and-white undercoat consisted of washes. We took 5 or 6 different shades and randomly dabbed them across all the surfaces.
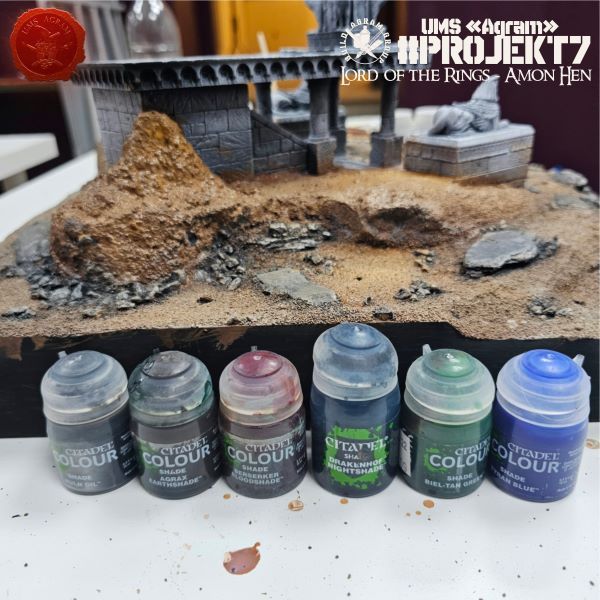
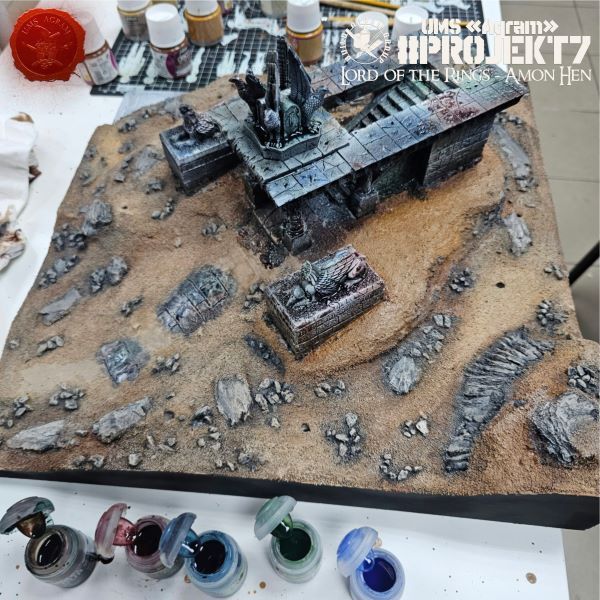
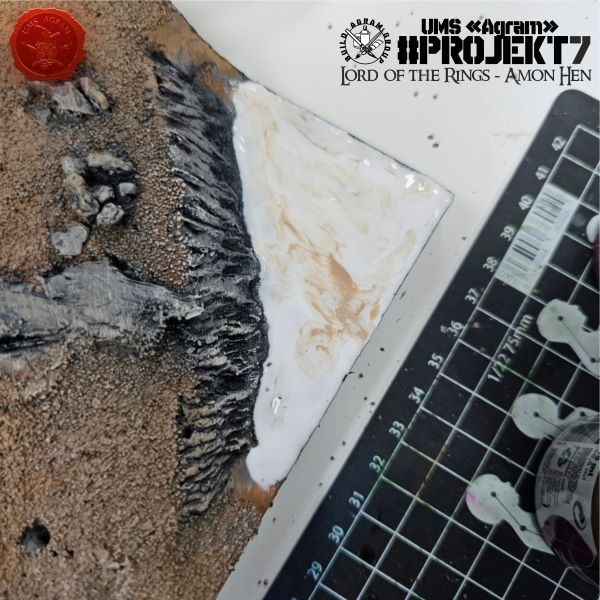
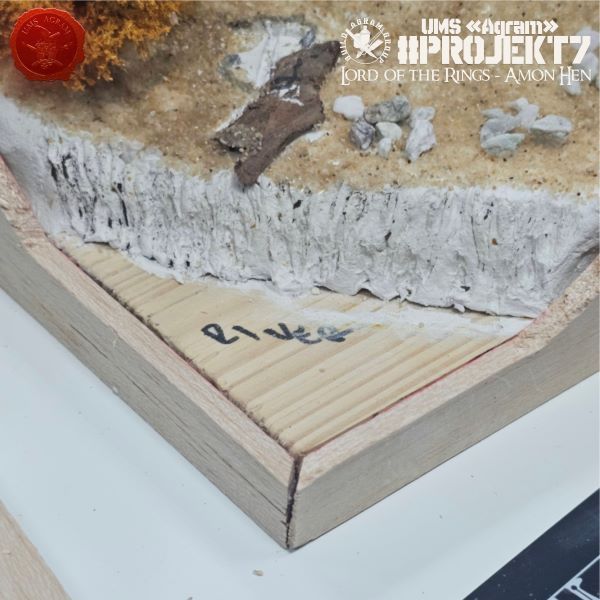
Since our time was running out, we decided to stop painting there and give the washes a chance to dry thoroughly. The final step for the board was applying a thick layer of PVA glue to the corner where the river would be. We did this to smooth out the surface, as we had decided to simply paint the river rather than adding any "depth."
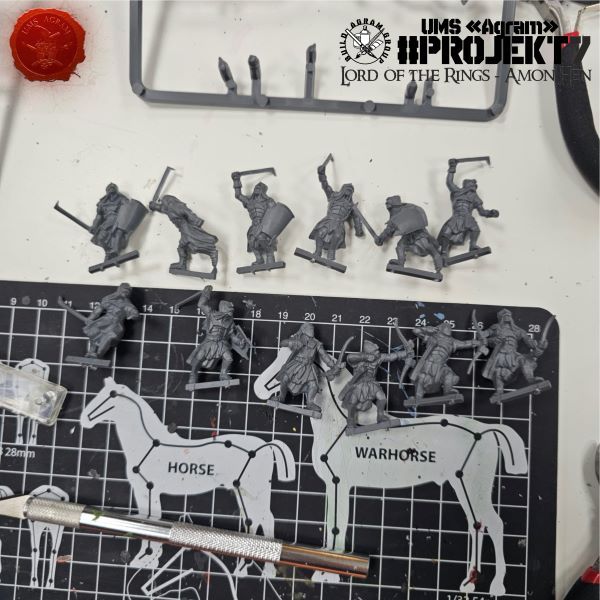
Meanwhile, Kruno set to work preparing the newly arrived Uruk-hai figures. He removed the first half of the figures from the sprue and cleaned off the flash.
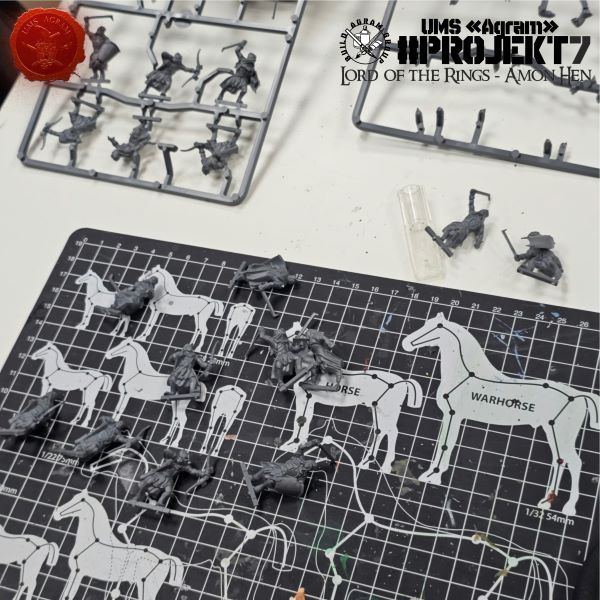
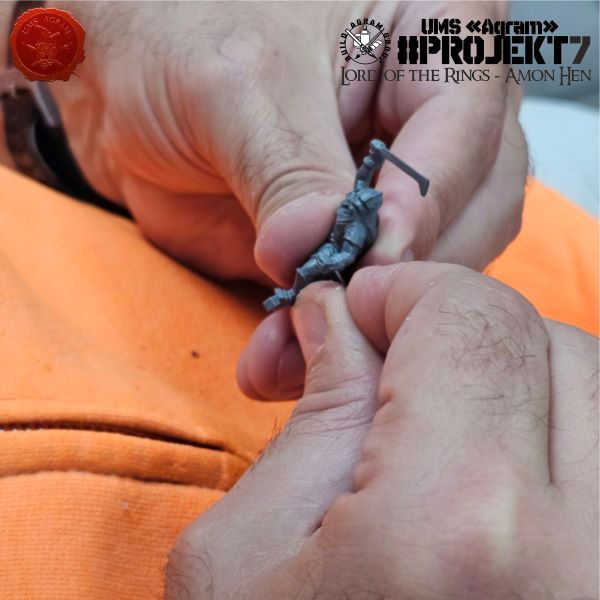
He organized them and removed the tabs for the bases. Next time, he will continue with the second half.
" ["content_hrv"]=> string(6871) "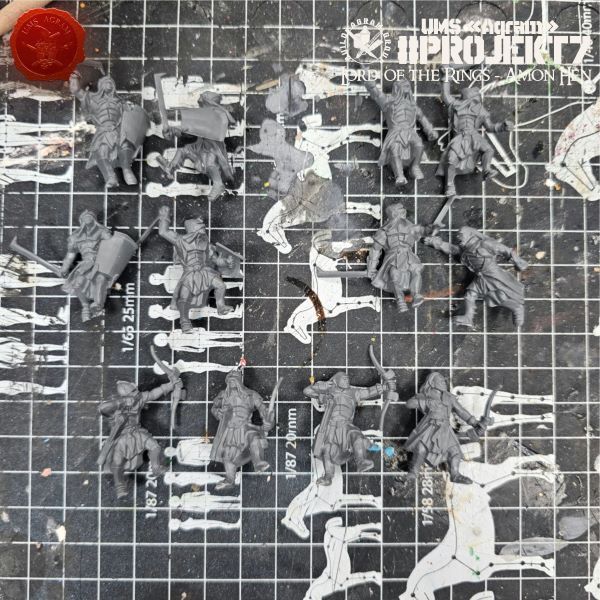
Agram Group Build se vraća. U svojoj sedmoj instalaciji, ekipa je odlučila izraditi igraću tablu / dioramu za Amon Hen. Za tu potrebu, ispunili smo si dječačke sne i nabavili originalni Forge World teren Amon Hena (izašao negdje cca 2000.) sa setom pripadajućih figura. Ova serija članaka pratit će izradu cijelog projekta – kako izrade terena, tako i sastavljanja i bojanja figura.

Kao što smo najavili, ovaj put započinjemo sa bojanjem. Prvi korak bio je nanošenje crne temeljne boje (sprejem) i onda bijele da istakne detalje.
Zatim je uslijedilo bojanje terena. Kao i uvijek, koristimo paletu smeđih i sivih boja marke Pebeo Deco. To su akrilne boje, relativno pristupačne cijenom, a dosta guste tako da omogućava lagano prekrivanje ili brzi drybrush ako nam zatreba. Prvo smo odradili smeđe nijanse, krenuvši prvo od tamnijih i završivši sa svjetlijim nijansama.
Zatim smo kamene plohe istaknuli crnom bojom i onda posvjetljavali sivim nijansama od tamnijih do svijetlijih. Hram i kipove smo ostavili prekrivene samo sprejevima iz prvog koraka.
Kad je baza bila gotova, okrenuli smo se hramu i kipovima. Prvi sloj boje koje smo stavili na crno-bijeli undercoat bili su washevi. Uzeli smo 5, 6 nijansi i nasumično tapkali po svim plohama.
S obzirom da nam se termin bližio kraju, tu smo odlučili stati sa bojanjem i dati washevima priliku da se pošteno osuše. Zadnji korak na tabli bilo je dodavanje debelog sloja PVA ljepila na kut u kojem će biti rijeka. To smo napravili da izgladimo površinu s obzirom da smo odlučili da rijeku samo obojamo, bez dodavanja „dubine“.
Za to vrijeme, Kruno se bacio na pripremu novopridošlih figura Uruk Haia. Prvu polovicu figura je maknuo sa okvira (sprue) te očistio srhove.
Složio ih je i maknuo tabove za baze. Sljedeći put nastavlja s drugom polovicom.
" ["created"]=> string(19) "2026-10-22 09:56:04" ["modified"]=> string(19) "2026-10-22 09:56:04" } ["Member"]=> array(10) { ["id"]=> string(2) "35" ["group_id"]=> string(1) "1" ["first_name"]=> string(5) "Marko" ["last_name"]=> string(9) "Paunović" ["first_name_mask"]=> string(5) "marko" ["last_name_mask"]=> string(8) "paunovic" ["username"]=> string(5) "marko" ["password"]=> string(40) "3bd37b326d19d1880d3b93a4b32e8fb3a90fa122" ["born"]=> string(19) "2033-03-07 20:35:00" ["created"]=> string(19) "2009-06-02 20:37:03" } } -
LIZARDMEN SAUROPOD - dio 1.
array(2) { ["Article"]=> array(10) { ["id"]=> string(3) "531" ["member_id"]=> string(3) "100" ["title_eng"]=> string(29) "Lizardmen Sauropod – part 1" ["title_hrv"]=> string(27) "LIZARDMEN SAUROPOD - dio 1." ["mask_eng"]=> string(25) "lizardmen_sauropod_part_1" ["mask_hrv"]=> string(26) "lizardmen_sauropod_-_dio_1" ["content_eng"]=> string(3455) "Mario Grgurev, 19.10.2026.While printing a sauropod model—which I intended to use for a kitbash of a Lizardmen Bastiladon—one of the printed torsos ended up with defects in the legs. Around the same time, I was playing Pokémon Crystal; having fallen in love with some of the concepts in that game, I decided to merge the two worlds into one.
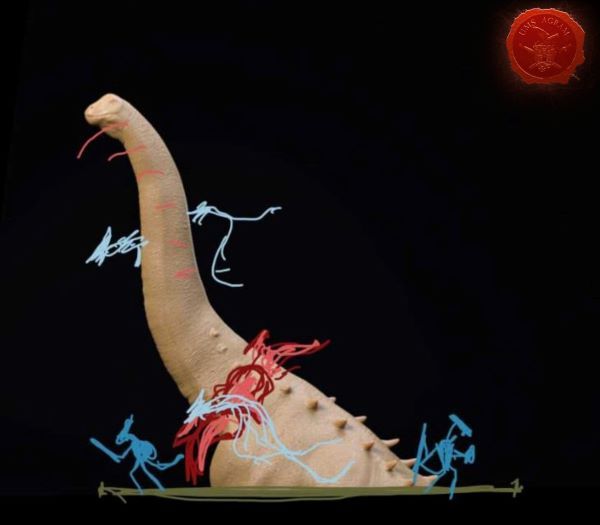
Taking the Pokémon Meganium as a starting concept, I wanted to create a dinosaur on a large base emerging from a lake, surrounded by skinks that are grooming it.
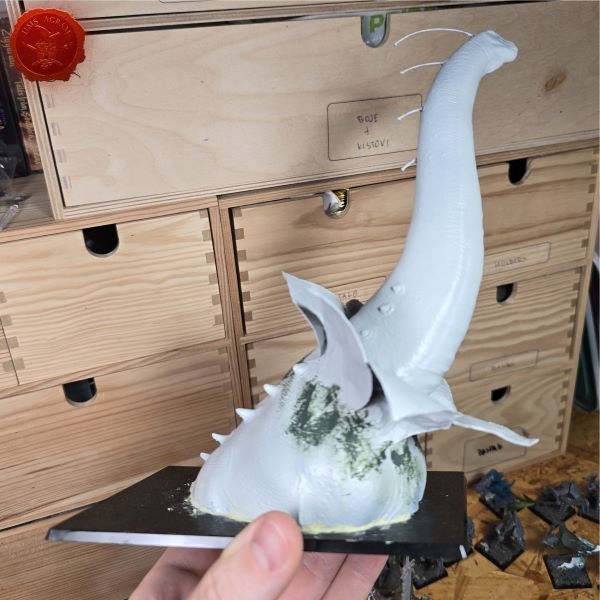
To achieve this, I decided to cut off the lower part of the torso—excluding the legs—position the model so it "lies" on the base, place a couple of Skinks around it, and pour resin over the base to create the effect of lake water.
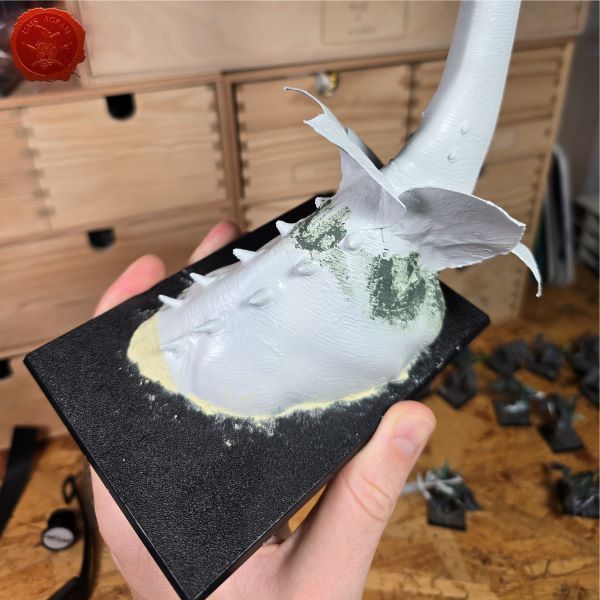
The first step was to create flower petals around the dinosaur's neck. I used slightly thicker paper, cut into the shape of petals. Afterward, I glued them together with super glue to form a flower shape. I coated each petal with wood glue—applying about 6 layers—to set them into a form that would be both flexible and sturdy enough for painting. I applied each coat using a small brush, with outward strokes, to create texture on the surfaces of the petals.
I glued the dinosaur's torso to the base using superglue and filled the gaps.
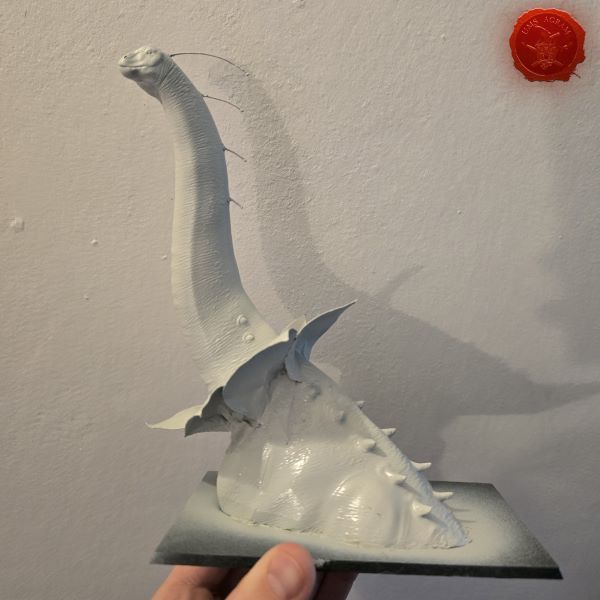
Preparation for painting was the easier part of the job; the primer used was a light-grey spray, followed by a single coat of a purple 'contrast' paint. After that, I dry-brushed the entire model with white. This created a strange, sickly base for the subsequent layers of green. This concludes the first part of the tutorial; in the second part, I will continue with painting, casting resin, and adding the final details to the model.
" ["content_hrv"]=> string(3240) "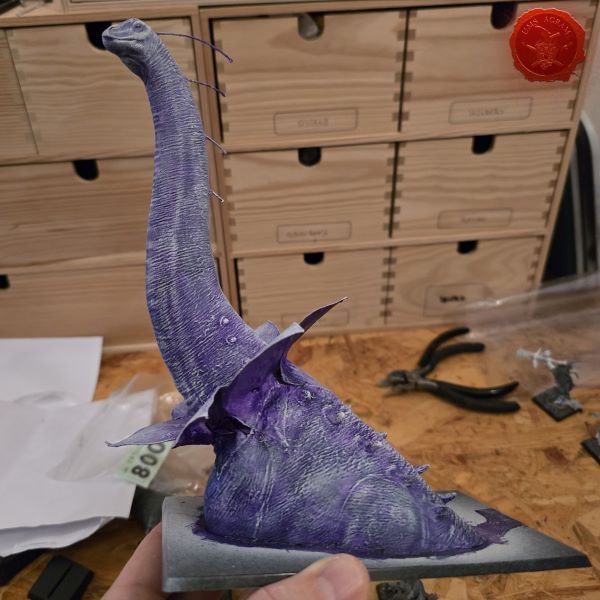
Prilikom printa modela sauropoda kojeg sam mislio koristiti za kitbash Lizardmen modela bastiladona, ostao je jedan printani model trupa sa greškama u nogama. U slično vrijeme sam igrao Pokemon Crystal i obožavajući neke od koncepata u toj igri, odlučio sam spojiti dva svijeta u jedan.
Uzevši pokemona Meganium-a kao početni koncept, želio sam napraviti dinosaura na velikoj bazi koji izranja iz jezera, okruženog skinkovima koji ga timare.
Da bih to izveo, odlučio sam odrezati donji dio trupa bez nogu, postaviti model da "leži" na bazi, postaviti par skinkova oko njega i preliti bazu sa rezinom kako bih stvorio efekt jezerske vode.
Prvi korak je bio napraviti latice cvijeta oko vrata dinosura. Koristio sam malo deblji papir, izrezan u oblik latice. Nakon toga sam ih zalijepio super ljepilom u oblik cvijeta. Premazao sam svaki list drvofixom u cca 6 slojeva, kako bih učvrstio listove u formu u kojoj će biti elastični i čvrsti za bojanje. Sve premaze sam radio s manjim kistom potezima prema van, kako bih stvorio teksturu na stranicama latica.
Trup dinosaura sam zalijepio na bazu sa superljepilom i zapunio rupe.
Priprema za bojanje je bila lakši dio posla, primer je bio svijetlosivi sprej, sa jednim slojem ljubičaste contrast boje. Nakon toga sam drybrushem bijele prekrio cijrli model. Ovime sam dobio čudnu bolesnjikavu bazu za slojeve zelene. Ovime završavam prvi dio tutoriala, nastavljam u drugom sa bojanjem i lijevanjem rezinske mase, uz završne detalje modela.
" ["created"]=> string(19) "2026-10-19 07:14:35" ["modified"]=> string(19) "2026-10-19 07:14:35" } ["Member"]=> array(10) { ["id"]=> string(3) "100" ["group_id"]=> string(1) "2" ["first_name"]=> string(5) "Mario" ["last_name"]=> string(7) "Grgurev" ["first_name_mask"]=> string(5) "mario" ["last_name_mask"]=> string(7) "grgurev" ["username"]=> string(9) "lepimario" ["password"]=> string(40) "11e0b1ecc2c467637dfa513774d2426f3b925264" ["born"]=> string(19) "2045-01-21 09:02:00" ["created"]=> string(19) "2022-01-21 09:02:32" } } -
Agram Group Build #7 – Amon Hen, dio 5
array(2) { ["Article"]=> array(10) { ["id"]=> string(3) "530" ["member_id"]=> string(2) "64" ["title_eng"]=> string(39) "Agram Group Build #7 – Amon Hen, pt.5" ["title_hrv"]=> string(40) "Agram Group Build #7 – Amon Hen, dio 5" ["mask_eng"]=> string(32) "agram_group_build_7_amon_hen_pt5" ["mask_hrv"]=> string(34) "agram_group_build_7_amon_hen_dio_5" ["content_eng"]=> string(4850) "Krunoslav Belinić, 15.10.2026.Agram Group Build is back. For this seventh installment, the team decided to create a gaming board/diorama for Amon Hen. To that end, we fulfilled a childhood dream and acquired the original Forge World Amon Hen terrain (released around 2000) along with the accompanying set of miniatures. This series of articles will document the entire project—from crafting the terrain to assembling and painting the miniatures.
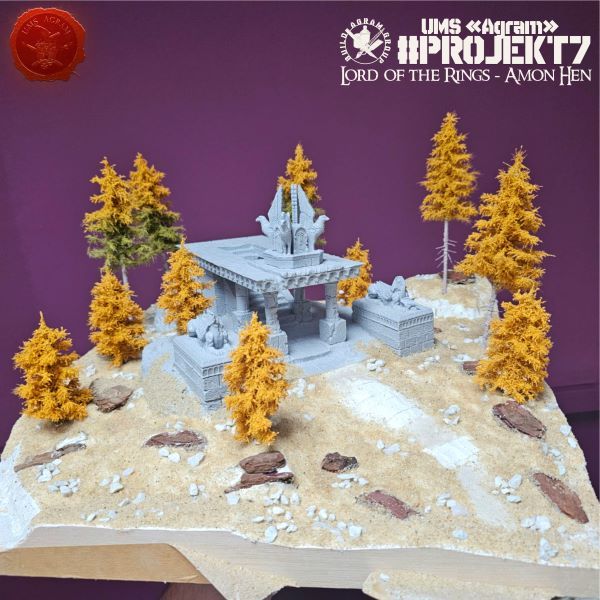
The plan last time was to also build a balsa wood frame, but unfortunately, the balsa got misplaced during the move following the renovation of the space, so we had to postpone it. Now, it’s time to get it done.
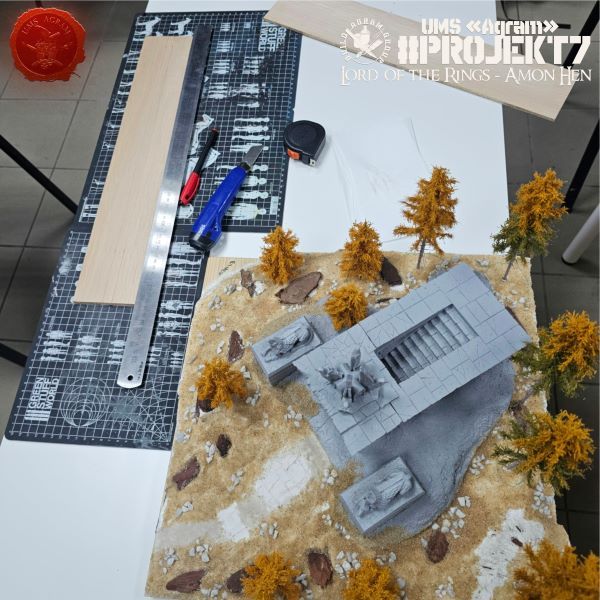
We cut the balsa wood into four 50 cm pieces. Afterward, we measured the highest points of each side, marked the balsa accordingly, and cut it to the desired dimensions.
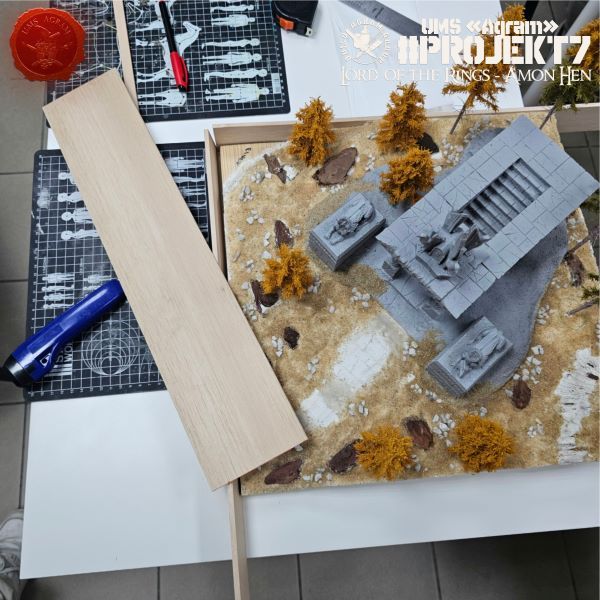
Then we traced the relief onto the balsa frame and carefully cut it out.
The final step was cutting each corner at a 45-degree angle to create a neat frame joint.
Next came the gluing of the frame. We bonded the sides using PVA glue, while the joints where one frame side met another were secured with superglue.
We filled the gaps between the balsa wood frame and the terrain we created last time with DAS modeling clay.
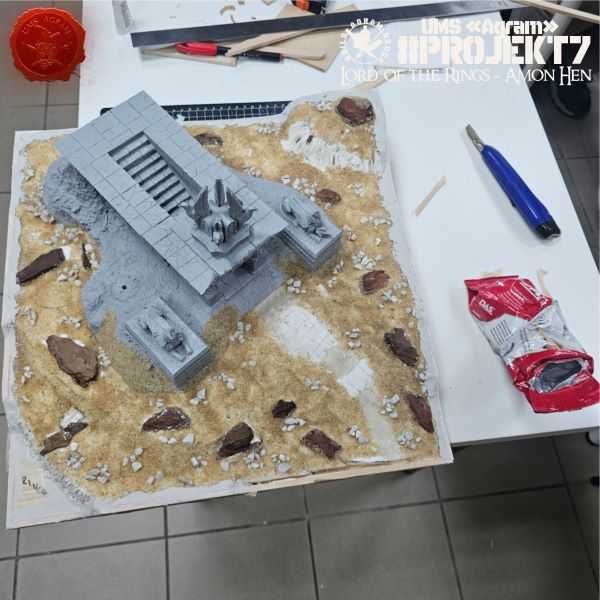
Finally, we coated the top surfaces of the frame and the air-drying clay infill with PVA glue, and sprinkled over it the same sand we had used for the rest of the board.
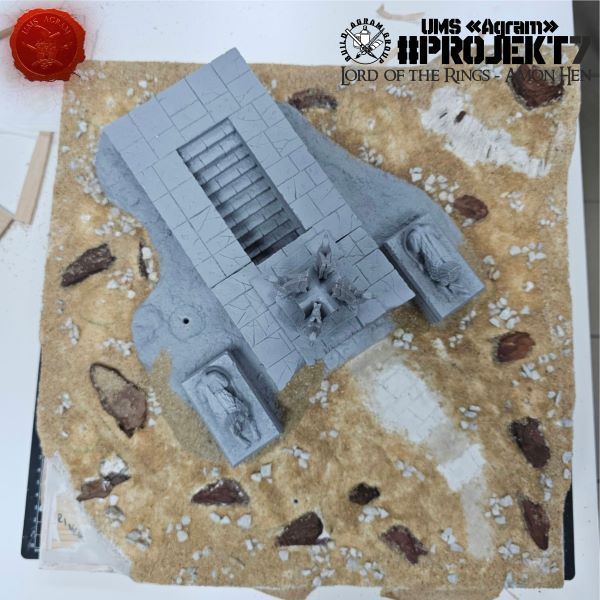
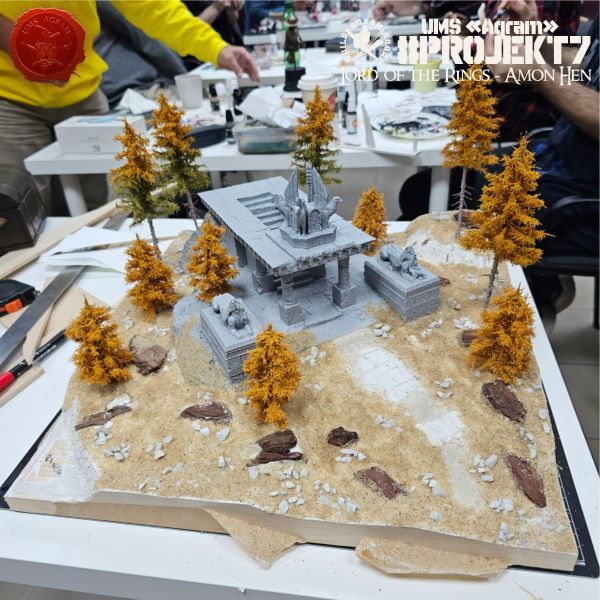
And that’s it for this time. Next week, it’s time for painting.
" ["content_hrv"]=> string(4765) "Agram Group Build se vraća. U svojoj sedmoj instalaciji, ekipa je odlučila izraditi igraću tablu / dioramu za Amon Hen. Za tu potrebu, ispunili smo si dječačke sne i nabavili originalni Forge World teren Amon Hena (izašao negdje cca 2000.) sa setom pripadajućih figura. Ova serija članaka pratit će izradu cijelog projekta – kako izrade terena, tako i sastavljanja i bojanja figura.
Plan za prošli put bio je da napravimo i okvir od balze, ali na žalost u selidbi nakon renovacije prostora, negdje smo zagubili balzu tako da smo to odgodili. Sad je došao red na to.
Odrezali smo balzu na četiri komada od 50cm. Nakon toga izmjerili smo najviše dijelove pojedine strane i tako označili balzu te ju prerezali na željene dimenzije.
Potom smo ucrtali reljef na okvir od balze i pažljivo ga izrezali.
Zadnji korak bilo je zarezivanje svakog kuta pod 45 stupnjeva tako da dobijemo uredan spoj okvira.
Tada je uslijedilo lijepljenje okvira. Stranice smo zalijepili PVA ljepilom dok smo spojeve stranice okvira na drugu stranicu okvira zalijepili superljepilom.
U rupe između okvira od balze i terena kojeg smo napravili prošli put ubacili smo DAS glinamol.
Na kraju smo gornje plohe okvira i popune od glinamola premazali PVA ljepilom te na to posipali isti pijesak koji smo koristili za ostatak table.
I to je bilo to za ovaj put. Sljedećeg tjedna ide bojanje.
" ["created"]=> string(19) "2026-10-15 10:05:42" ["modified"]=> string(19) "2026-10-15 10:05:42" } ["Member"]=> array(10) { ["id"]=> string(2) "64" ["group_id"]=> string(1) "1" ["first_name"]=> string(9) "Krunoslav" ["last_name"]=> string(8) "Belinić" ["first_name_mask"]=> string(9) "krunoslav" ["last_name_mask"]=> string(7) "belinic" ["username"]=> string(5) "Kruno" ["password"]=> string(40) "eb3fda45fbec0258e90d809803b10491c548b22f" ["born"]=> string(19) "2015-01-18 09:19:00" ["created"]=> string(19) "2015-01-18 09:20:39" } } -
Agram Group Build #7 – Amon Hen, dio 4
array(2) { ["Article"]=> array(10) { ["id"]=> string(3) "529" ["member_id"]=> string(2) "35" ["title_eng"]=> string(39) "Agram Group Build #7 – Amon Hen, pt.4" ["title_hrv"]=> string(40) "Agram Group Build #7 – Amon Hen, dio 4" ["mask_eng"]=> string(32) "agram_group_build_7_amon_hen_pt4" ["mask_hrv"]=> string(34) "agram_group_build_7_amon_hen_dio_4" ["content_eng"]=> string(4716) "Marko Paunović, 08.10.2026.Agram Group Build is back. For this seventh installment, the team decided to create a gaming board/diorama for Amon Hen. To that end, we fulfilled a childhood dream and acquired the original Forge World Amon Hen terrain (released around 2000) along with the accompanying set of miniatures. This series of articles will document the entire project—from crafting the terrain to assembling and painting the miniatures.
After inspecting the now-dry terrain base, we realized that a few slopes needed to be added and some gaps filled in. Therefore, we repeated the process of applying DAS modeling clay over the PVA glue coating.
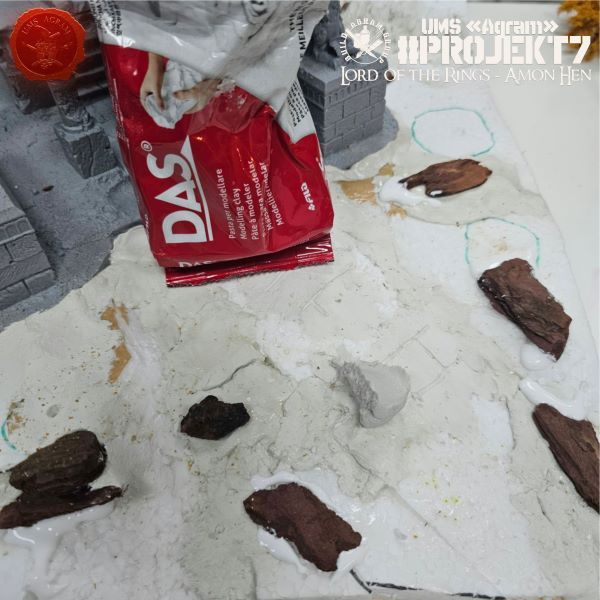
The next step was adding texture. We opted for three different grain sizes of sand and gravel. You can find all these varieties at pet stores. The finest grade is for chinchillas, while the coarsest gravel is actually intended for aquariums.
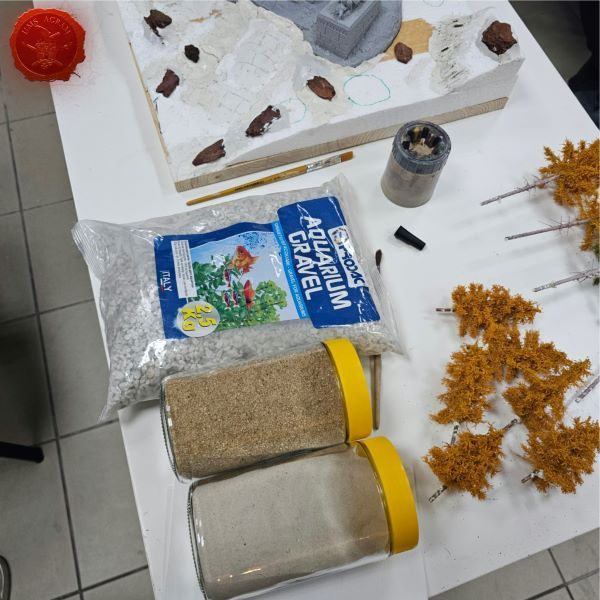
Applying the texture was actually very simple. We coated part of the base with PVA glue (slightly diluted so it would spread easily with a brush). Onto the PVA coating, we sprinkled first the gravel, then the larger granules, and finally the small granules (though only in patches).
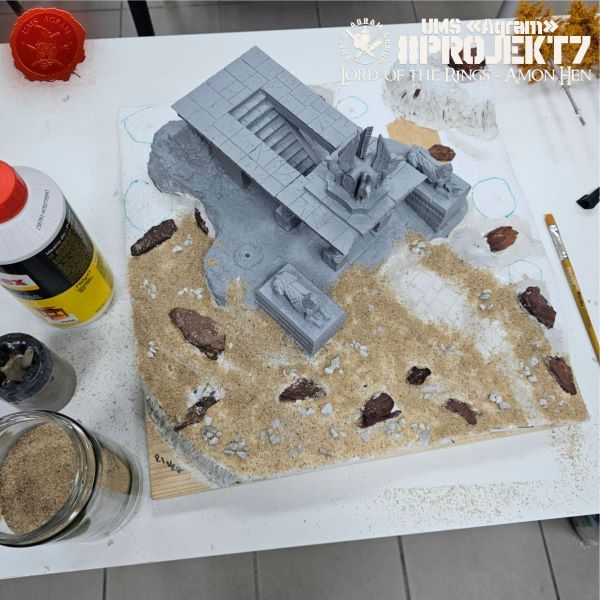
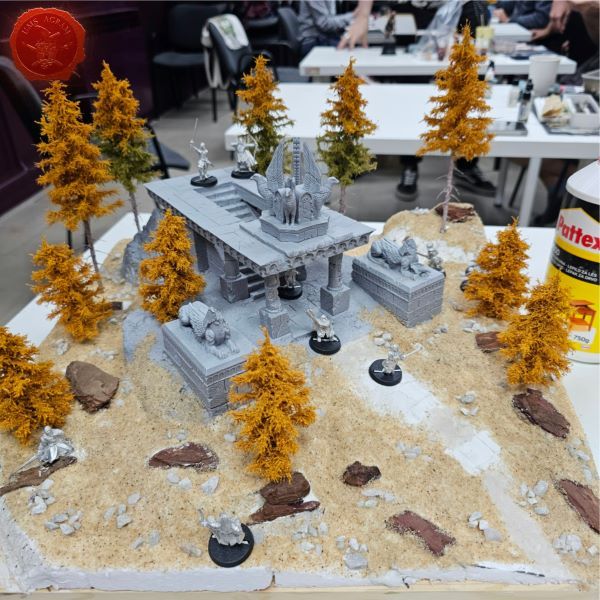
Then we put the trees back to see how everything works as a whole.
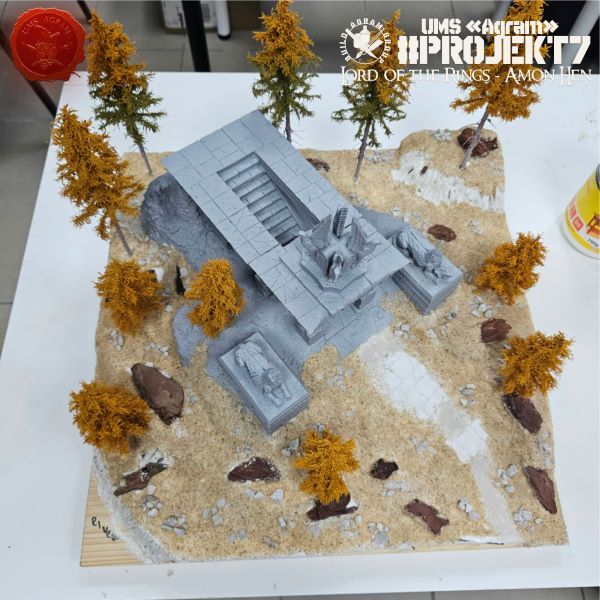
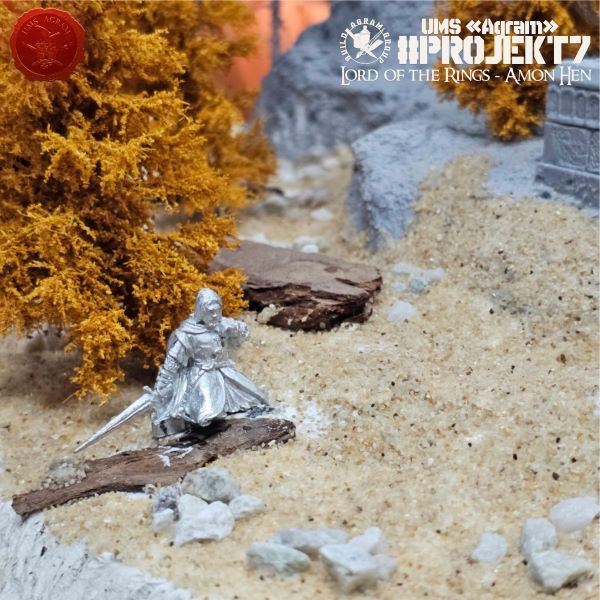
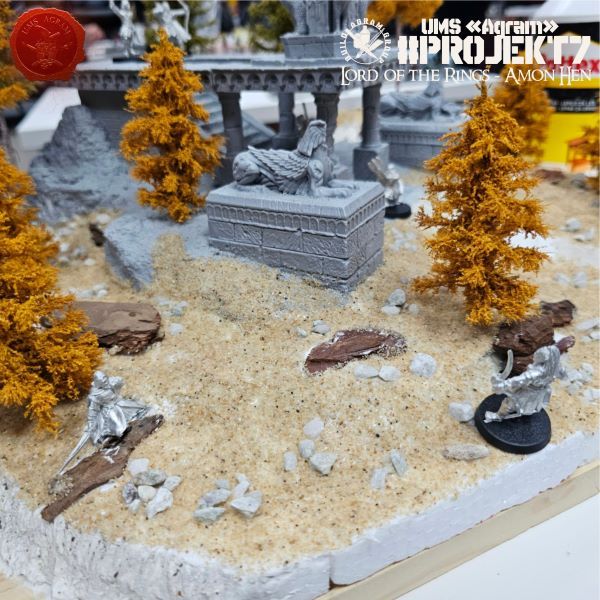
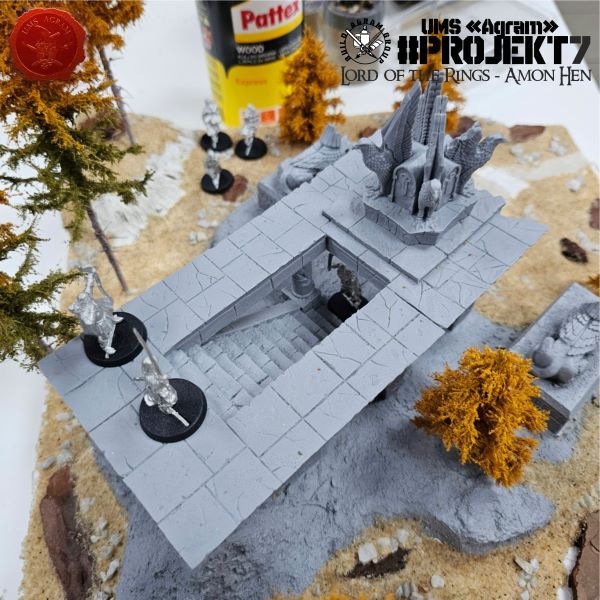
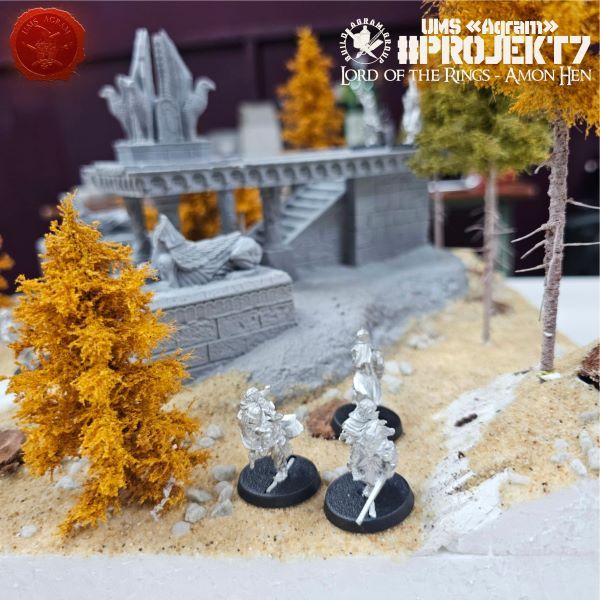
Since Kruno has finished processing the metal figures, we decided to check the layout of the diorama with the figures placed on it—so here it is from several angles.
" ["content_hrv"]=> string(4717) "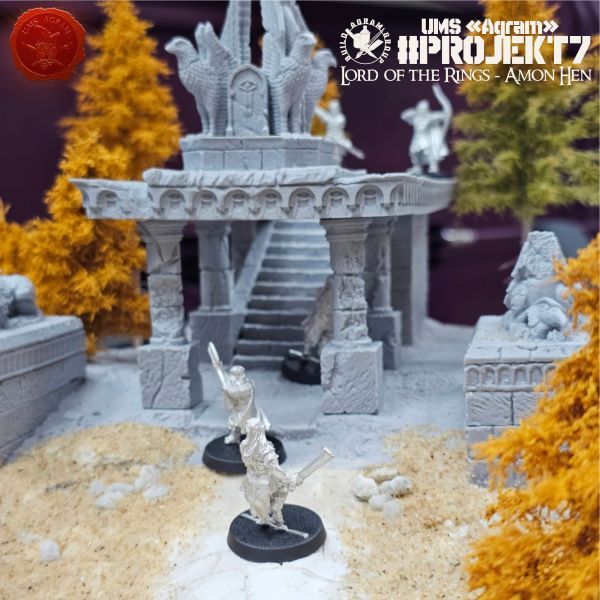
Agram Group Build se vraća. U svojoj sedmoj instalaciji, ekipa je odlučila izraditi igraću tablu / dioramu za Amon Hen. Za tu potrebu, ispunili smo si dječačke sne i nabavili originalni Forge World teren Amon Hena (izašao negdje cca 2000.) sa setom pripadajućih figura. Ova serija članaka pratit će izradu cijelog projekta – kako izrade terena, tako i sastavljanja i bojanja figura.
Nakon pregleda sada osušene baze terena, uvidjeli smo da se na nekim mjestima treba dodati koja kosina, zapuniti koja rupa. Stoga smo ponovili isti postupak postavljanja DAS glinamola na premaz od PVA ljepila.
Sljedeći korak bilo je dodavanje teksture. Odlučili smo se za tri različite granulacije pijeska/šljunka. Sve te verzije možete naći u dućanima za kućne ljubimce. Najmanja granulacija je za činčile, dok je najveći šljunak zapravo za akvarije.
Postavljanje teksture je zapravo bilo jako jednostavno. Premazali smo dio baze sa PVA ljepilom (malo razvodnjenim tako da se lagano razmazuje kistom). Na premaz od PVA ljepila posipali smo prvo šljunak, pa onda veći granulat i na kraju mali granulat (ali samo mjestimično).
Potom smo vratili drveće da vidimo kako funkcionira sve kao cjelina.
S obzirom da je Kruno završio sa obradom metalnih figura, odlučili smo provjeriti i raspored diorame sa figurama na njoj pa evo iz nekoliko kutova.
" ["created"]=> string(19) "2026-10-08 08:17:15" ["modified"]=> string(19) "2026-10-08 08:17:15" } ["Member"]=> array(10) { ["id"]=> string(2) "35" ["group_id"]=> string(1) "1" ["first_name"]=> string(5) "Marko" ["last_name"]=> string(9) "Paunović" ["first_name_mask"]=> string(5) "marko" ["last_name_mask"]=> string(8) "paunovic" ["username"]=> string(5) "marko" ["password"]=> string(40) "3bd37b326d19d1880d3b93a4b32e8fb3a90fa122" ["born"]=> string(19) "2033-03-07 20:35:00" ["created"]=> string(19) "2009-06-02 20:37:03" } } -
Agram Group Build #7 – Amon Hen, dio 3
array(2) { ["Article"]=> array(10) { ["id"]=> string(3) "528" ["member_id"]=> string(2) "64" ["title_eng"]=> string(39) "Agram Group Build #7 – Amon Hen, pt.3" ["title_hrv"]=> string(40) "Agram Group Build #7 – Amon Hen, dio 3" ["mask_eng"]=> string(32) "agram_group_build_7_amon_hen_pt3" ["mask_hrv"]=> string(34) "agram_group_build_7_amon_hen_dio_3" ["content_eng"]=> string(3297) "Krunoslav Belinić, 01.10.2026.Agram Group Build is back. For this seventh installment, the team decided to create a gaming board/diorama for Amon Hen. To that end, we fulfilled a childhood dream and acquired the original Forge World Amon Hen terrain (released around 2000) along with the accompanying set of miniatures. This series of articles will document the entire project—from crafting the terrain to assembling and painting the miniatures.

Last time, we created and attached large volumes to the base and roughed out the terrain contours. To prevent the Styrofoam from warping while the PVA glue dried, we had secured it to the wooden base with masking tape. Therefore, the first task was to remove the excess masking tape.

Then, using PVA glue and DAS modeling clay, we created gradual transitions and built up slopes on the "steps" made of Styrofoam.

Next, we added stone structures using tree bark. At the same time, we utilized the texture of the bark, pressing it into the DAS clay in certain places to create the added texture of rocky surfaces.


That concludes the construction phase for now. Before applying the texture, the DAS modeling clay needs to dry thoroughly. Next up is the texturing process, along with some touch-ups to the relief where the stone structures were placed.
" ["content_hrv"]=> string(3309) "
Agram Group Build se vraća. U svojoj sedmoj instalaciji, ekipa je odlučila izraditi igraću tablu / dioramu za Amon Hen. Za tu potrebu, ispunili smo si dječačke sne i nabavili originalni Forge World teren Amon Hena (izašao negdje cca 2000.) sa setom pripadajućih figura. Ova serija članaka pratit će izradu cijelog projekta – kako izrade terena, tako i sastavljanja i bojanja figura.
Prošli put smo napravili i dodali velike volumene na bazu te napravili grube obrise terena. Kako se ne bi stiropor svinuo tijekom sušenja PVA ljepila, učvrstili smo ga krep trakom za drvenu bazu. Stoga, prvi posao bio je maknuti višak krep trake.
Zatim smo koristeći PVA ljepilo i DAS glinamol izradili postepene prijelaze i iskonstruirali kosine na „stepenicama“ dobivenim od stiropora.
Potom smo dodali kamene strukture koristeći koru od drveta. Istovremeno smo iskoristili i teksture u kori i utisnuli na pojedinim mjestima u DAS glinamol kako bismo dobili dodatnu teksturu kamenih stijena.
Time je lagano završila gradnja za ovaj put. Prije nanošenja teksture, treba ostaviti DAS glinamol da se dobro osuši. Sljedeći put na redu je tekstura uz mjestimično popravljanje reljefa na mjestima gdje smo postavili kamene strukture.
" ["created"]=> string(19) "2026-10-01 09:43:15" ["modified"]=> string(19) "2026-10-01 09:43:15" } ["Member"]=> array(10) { ["id"]=> string(2) "64" ["group_id"]=> string(1) "1" ["first_name"]=> string(9) "Krunoslav" ["last_name"]=> string(8) "Belinić" ["first_name_mask"]=> string(9) "krunoslav" ["last_name_mask"]=> string(7) "belinic" ["username"]=> string(5) "Kruno" ["password"]=> string(40) "eb3fda45fbec0258e90d809803b10491c548b22f" ["born"]=> string(19) "2015-01-18 09:19:00" ["created"]=> string(19) "2015-01-18 09:20:39" } }

















Najnoviji izvještaji s bojišta
- Kill Team - Blooded vs. Vespid Stingwings 28.02.2025., GW - Warhammer 40.000, i Antoni Pastuović (Imperial Guard)
- Dark Angels protiv T'au Battlereport 22.04.2022., GW - Warhammer 40.000, Borna Pleše (Space Marines) i Kristijan Kliska (Tau Empire)
- Sisters of Battle protiv Ultramarines 17.11.2021., GW - Warhammer 40.000, i Nino Marasović (Space Marines)